ROASTED WINTER SQUASH, FARRO AND GARLICKY KALE SALAD

This is just a slight variation of a much-loved salad of ours from Food52. Like the best recipes out there, Food52’s dish can act as a road map. Sub roasted squash for the sweet potato like we did here, sub dried dates in for the pomegranate seeds; take it the Mexican route by leaving out the dried fruit, subbing in scallion for the roasted red onion, pepitas for the walnuts, and cilantro for the mint…you get the idea.

Continue reading “ROASTED WINTER SQUASH, FARRO AND GARLICKY KALE SALAD”

Crispy Tofu Spring Rolls for Summer!

We love getting feedback from all our clients but, I must admit, I get most excited when it comes from our clients’ kids. I love hearing when their kids devoured our roasted salmon or actually finished their plate of veggies. So this month’s video is for the kiddos. There’s one thing that I’m pretty sure most parents can agree on and that’s how frustrating it can be to feed kids. I know from my own experience as a nanny that kids are very strong-willed when it comes to food and if they don’t want to eat it, they will find any excuse not to (feeding their peas to the dog when you’re not looking, chucking their apple slices in a bush on the way to school, etc.).


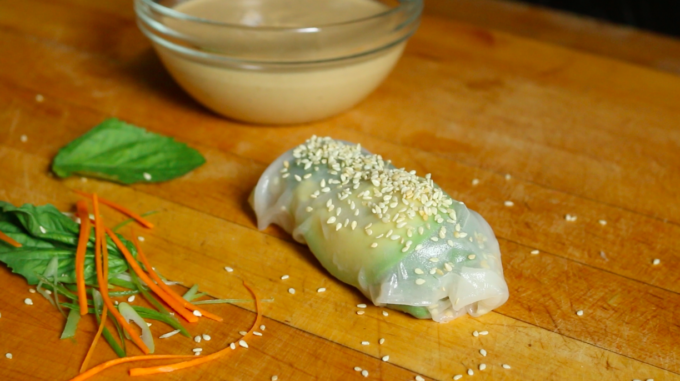
A big part of our job as private chefs involves accommodating these tenacious mini-clients. At WWE, we encourage our clients to use their imaginations and play with their food, especially the littles. We’re always trying to come up with kid-friendly, hands-on snacks that we can add to the rotation. These spring rolls are among our most successful. They also make for a great afterschool activity. Although it’s technically no longer spring, I’m pretty confident that these spring rolls are actually the perfect summer snack. The tangy peanut sauce is a classic and pairs perfectly with the delicate flavors wrapped up in these rolls. Keep these rice papers on hand and fill them with whatever’s lingering in your fridge or whatever veggies your kids are into.

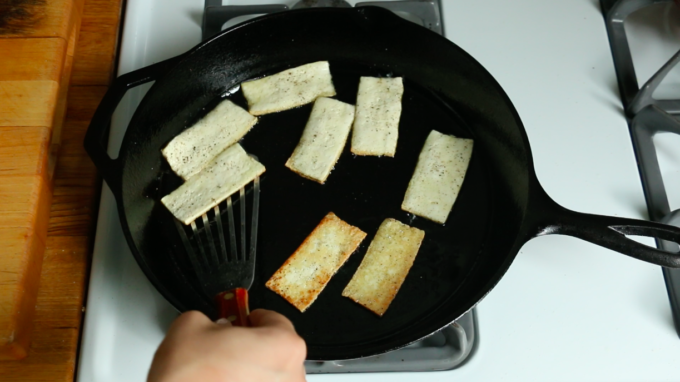
This video also serves double duty by demonstrating another one of our client faves, kids and grownups alike: crispy pan-fried tofu.

For crispy pan-fried tofu:

  • I like to use extra firm tofu because it’s less likely to fall apart when you’re slicing or break mid-flip in the pan.
  • Drain as much of the tofu liquid as possible by placing the tofu between absorbent paper towels or a clean dishcloth and weigh it downs with anything you have laying around that’s kind of heavy (an extra cast-iron or heavy plate work great). The dryer the tofu, the better the crunch.
  • Slice the tofu as thinly as possible in one fluid stroke. Avoid sawing at the tofu as it tends to crumble if you fuss with it too much.
  • Next heat a skillet on high with a nice layer of high-heat oil (grape seed oil, canola oil, safflower oil…) to avoid too much smoke.
  • Season both sides of each slice of tofu generously with salt and pepper.
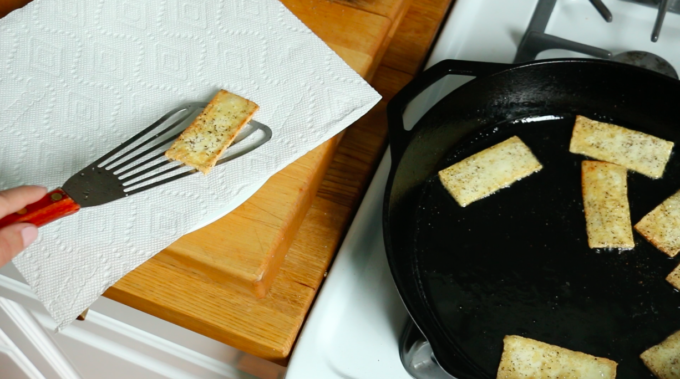
  • Working in batches, sear the tofu until a golden crust forms. They should be fairly stiff without much wiggle. This can be difficult to judge. For me, if it feels slimy and slippery when I’m trying to flip it, it’s not ready.
  • Once they’re crispy, drain the excess oil by placing the tofu on a plate covered in paper towel.
  • Serve in a salad, grain bowl, sesame noodle dish or spring roll. You name it.

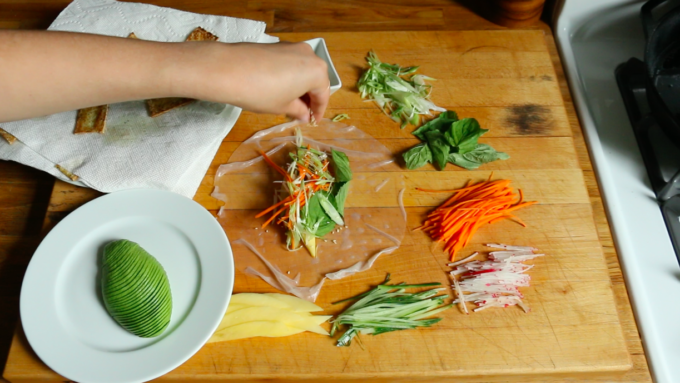
Spring roll fillings:

  • Tofu
  • Avocado
  • Julienned or grated carrots
  • Julienned or thinly sliced cucumber
  • Julienned or thinly sliced radish
  • Thinly sliced mango
  • Toasted sesame seeds
  • These are just what we had on hand but you can use anything as long as it’s small or thin enough to fit neatly inside.

Spring roll wrappers:

  • You can find these at most health foods stores or Asian food markets.
  • Fill a shallow bowl (we used a pie dish) with cold water.
  • Dip each sheet separately into the water and let sit for 1-2 minutes until the wrapper is pliable.
  • Lay the wrapper flat on a cutting board or clean work surface and allow your little ones to assemble it themselves.
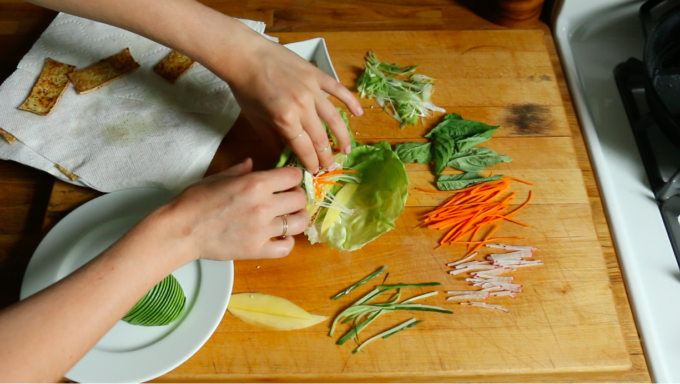
  • Roll it up like you would a burrito. The wrappers are pretty tough so don’t be shy!
  • Or forgot the rice paper wrapper all together and use a leafy green instead.
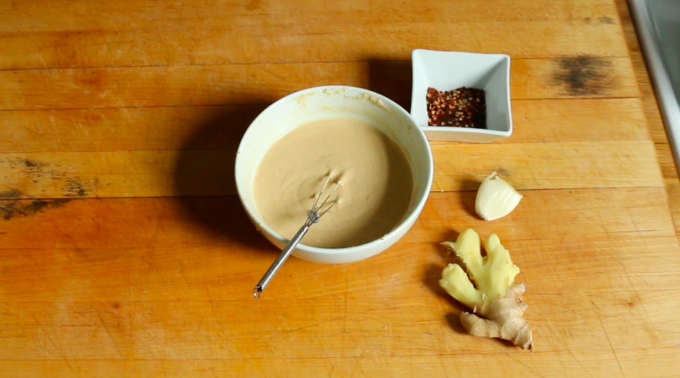
For dipping sauce:

  • We love a peanut sauce with 1/2 cup peanut butter lots of fresh grated ginger, garlic, a pinch of chili flakes, 1 tsp. toasted sesame oil, 2 Tbs. rice wine vinegar and 1/2 cup water.
  • You may also like a sweet and sour sauce or sweet mustard sauce.
  • Or just plain soy sauce!

xoxo,

Charlotte


SaveSave

SaveSave

SaveSave

All You Need to Know About Pork Tenderloin

Currently sitting at my favorite neighborhood patisserie – nibbling on the best chocolate almond croissant in Park Slope (Colson at the corner of 9th and 6th ave) – piecing together the clips of my first totally solo video project. And it’s starting to feel like a mining operation: pealing away the jumbled parts of my 3-hour, single-take, cut-less footage and jerky tripod adjustments – a testament to the importance of asking for an extra set of hands. However, my favorite part of this whole process of making these videos has been the challenge of putting my film schooling to practice in this new food video domain. It’s not perfect and my standards are much too high but it’s really fun. I love the process of demonstrating a process. Food is a process. It’s practice and it’s putting your knowledge of ingredients and tools to the test. Sometimes it doesn’t turn out the way we envision but when it does the process of getting to that point makes you feel like an expert the next time around. Being confident and accepting the process is the key to success.

This video came about because some folks commented on one of our pork tenderloin Instagram posts, professing their frustration with pan-searing pork and that it never looks like “that”. But, I’ll be honest, neither did mine. It took me a few tries and lots of deep breaths to get it right. Laura and the crew would probably say it was my biggest hurdle. But I’m here to tell you that it is possible! Here are a few tips I picked up in the process 🙂

  • Prepping a pork tenderloin:
    • Pork is best seared, to get that crispy, unctuous crust, then popped in the oven at 425 degrees to finish.
    • First, you must trim off something called the “silverskin”. According to my research, “silverskin is connective tissue that doesn’t dissolve when the tenderloin is cooked, so it needs to be trimmed away” (finecooking.com). Hold it tightly with your fingertips and stick a sharp knife, preferably a boning knife or pairing knife, through to make a thin slit and follow the tissue until it’s removed.

  • The longer you marinate, the better.
    • Next, it’s important to marinate the tenderloin for as long as possible, at least an hour. Although, we all know apple and pork is a winning combo, pork is also great with almost any citrus. Pork absorbs flavors beautifully. You can adjust your seasonings to go along with whatever you’re making.
    • Make sure you strip the pork of excess marinade before you start searing but don’t pour it down the drain just yet! You’ll use it later. You can also add a little something extra to the marinade after you’ve stripped it like honey or agave, sriracha, anything that is likely to burn in the pan while it sears. We added honey to the recipe in this video and created a sweet glaze.
    • (Bonus tip: you can also make extra marinade before you add the pork to use as salad dressing!)

  • How to get the perfect sear every time:
    • When you’re searing pork, or anything for that matter, you want to make sure your pan is really really hot. You can test this with the water splash test, if it sizzles you’re ready to go. Add the oil. This can be anything you have laying around but if you’re getting really technical, you’ll want something with a “high-smoke-point” (things like grapeseed oil, safflower oil or canola oil). Make sure it covers the whole surface of the pan, then carefully layer the meat on top. It will splatter so watch out!
    • You’re going to create an even sear around the whole tenderloin so it’s crispy all the way around. To do this, you’ll roll the pork toward (or away) from you, allowing the pork to get a nice sear on each roll. On the last roll just turn, spread with your excess marinade or glaze and pop it in the oven.

  • Finish it off in the oven.
    • Oven timing is tricky here because oven temps vary, pork girth vary, and different pans transfer heat differently. Before you give up, there’s an easy solution. Welcome meat thermometer! Check the pork after about 6-8 minutes. Stick the thermometer in the thickest park of the meat. You want it to read 135-140. It will finish cooking while it settles.

  • Let it rest!
    • Probably the most important tip we can give you is to let it rest. Make sure the pork rests for at least 10 minutes – just enough time to whip up your salad or strain your rice. This will ensure juicy pork. Even if you think you overcooked it, it will still be delicious and juicy if you allow the meat to rest.
  • Save le jus.
    • The final tip I have is to pour the juices that pool on your cutting board over the meat. It’s a trick I learned long ago and will never serve meat to another living soul without it. Perhaps the simplest way to transform a piece of meat into a savory chef-d’oeuvre.

Our go-to pork marinade ingredients and pairings:

As shown in the video:

  • Roasted pork tenderloin with lots of fresh thyme, rosemary, garlic, salt + pepper and honey to finish.
    • Paired with delicate Boston lettuce, shaved radish, lightly blanched green beans, and brown rice with a lemon-dijon vinaigrette
  • Roasted pork tenderloin with orange zest, garlic, grainy Dijon mustard and honey to finish
    • Paired with roasted sweet potato wedges, quinoa and simple arugula salad with citrus Dijon vinaigrette
  • Laura’s Cooks vs. Cons pork tenderloin: http://whatweeat.nyc/cooks-vs-cons-behind-the-scenes/