Root Veggies on Parade

Beet varieties at the Park Slope Food Coop

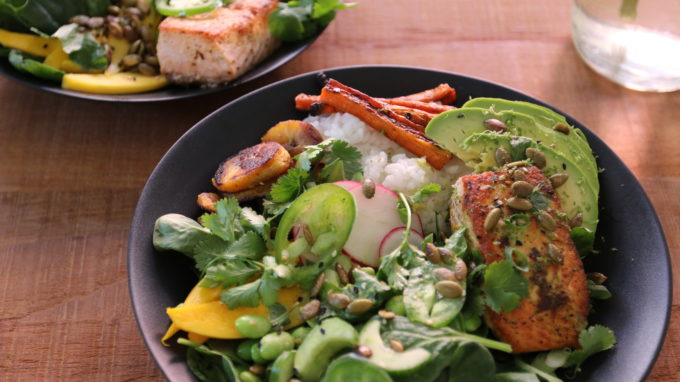
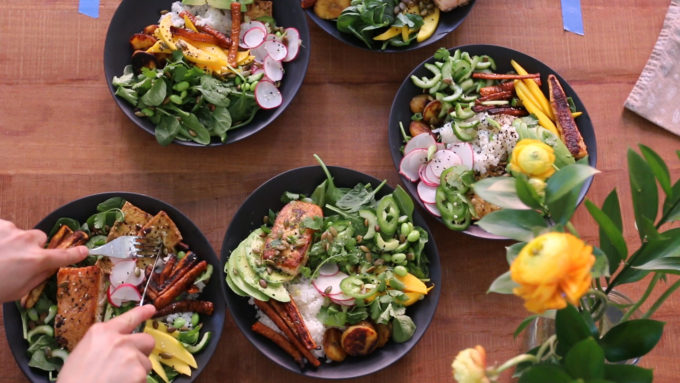
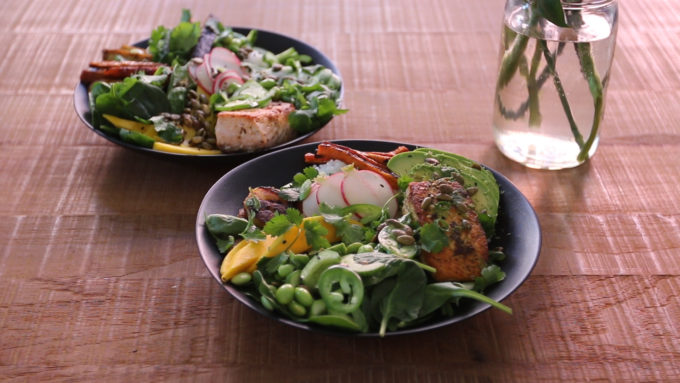
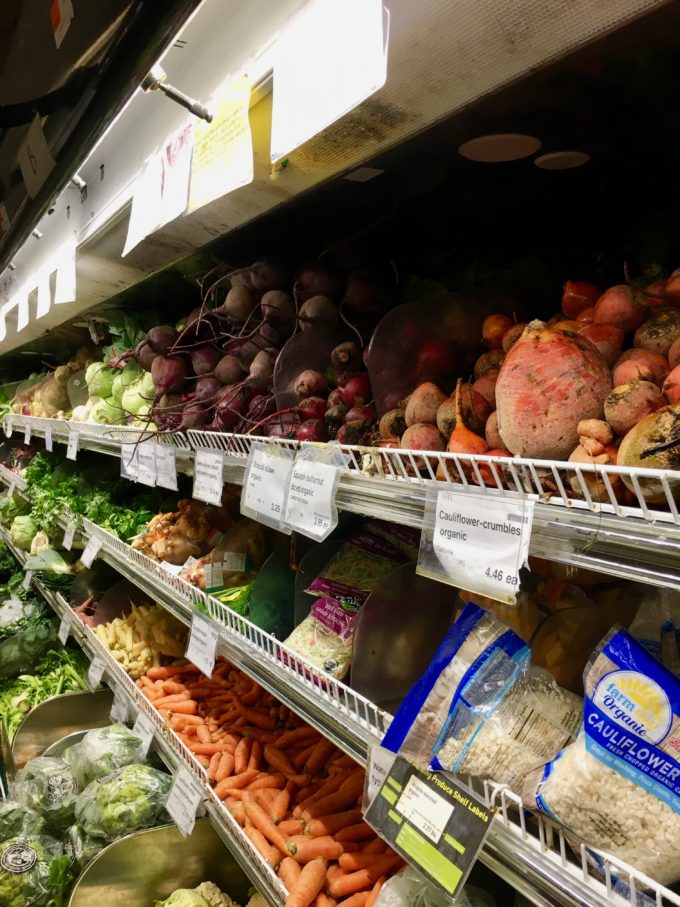
Everyone direct your attention to the nearest produce section, brimming with veggies in every odd shape and color of the rainbow. It’s time to familiarize yourself with the scraggily, weird looking veggies, pulled straight from the ground that have settled on produce shelves for the winter. They include such favorites as carrots, celery, parsnips, radish, turnips, beets, potatoes, onions, shallots, garlic and rutabaga… well maybe not that last one but it’s just so fun to say! Besides rutabaga these are some of the most common things we find in the crisper drawer, probably because they last much longer than your fruits or your greens. They’re something we’re confident using two weeks in a row, which makes our job all the more experimental and exciting.

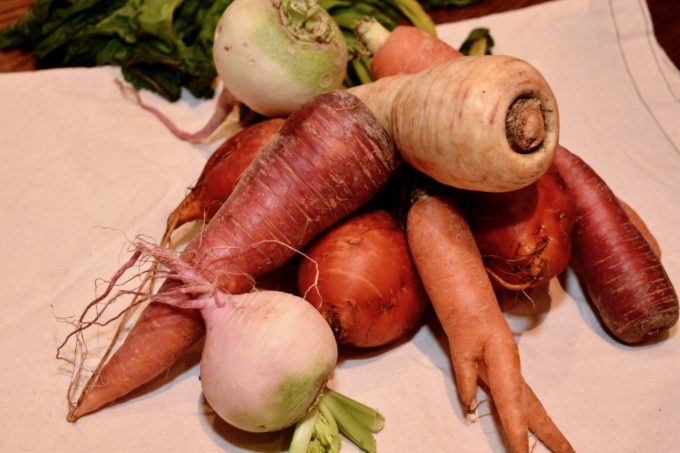
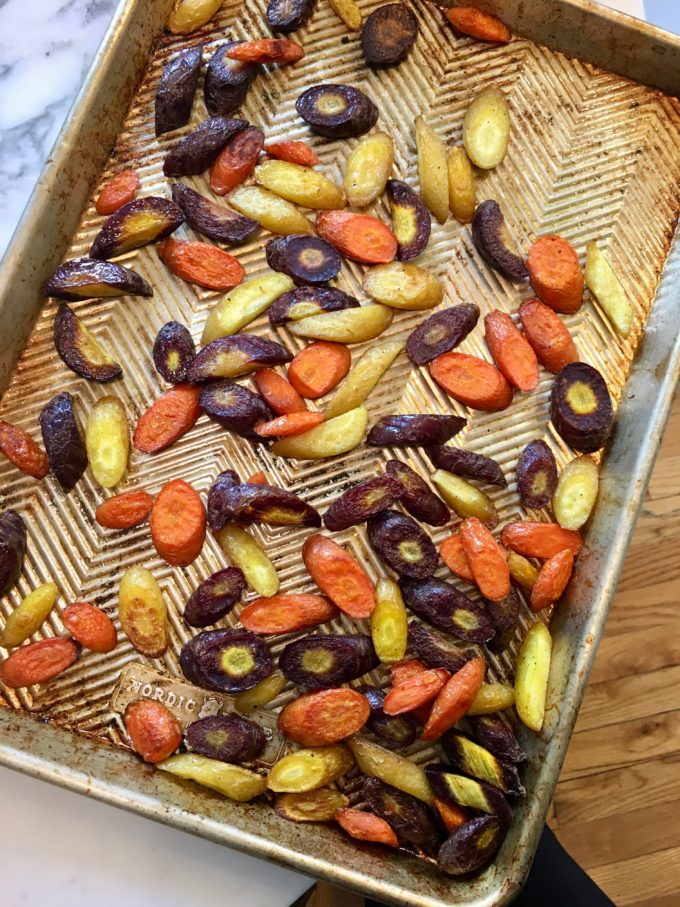
There’s almost nothing I find more comforting than biting into a warm roasted carrot, which is why, when I surveyed my supermarket this weekend, just as the temperature finally dropped below 60, I ended up with mostly carrots in my handcart. I love the way they’re equally delicious raw as they are cooked and how they add just the right amount of sweetness to a dish.

A few more things you should know about carrots:

  • You don’t need to peel them unless you’re eating them raw.
  • While carrots are very nutritious (vitamin A, C, potassium, etc.) most of the nutrients in carrots actually reside in or just bellow the skin so it’s best not to peel away too much.
  • For candy-like caramelized carrots drizzle a little honey or maple syrup on them before roasting.
  • As we know carrots come in many colors. But when carrots were first cultivated (some ten thousand years ago) they were actually purple, not the orange color we associate them with most today (www.carrotmuseum.com).
  • You really will turn orange if you eat too many of the orange ones!

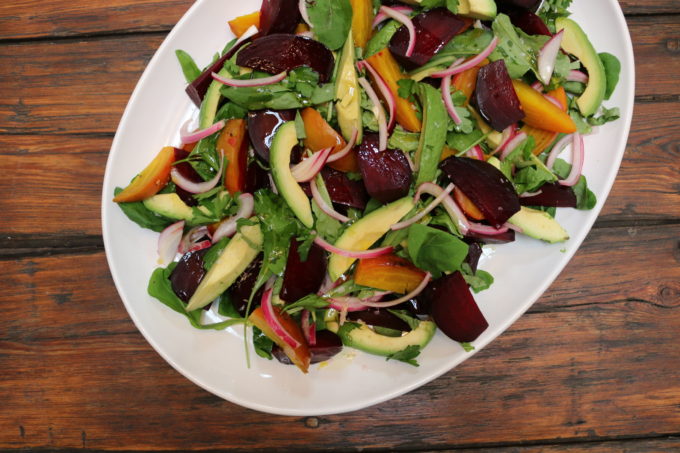
The second root-veggie I find it hard to resist is beets. When I see them on a menu I must have them, especially when they’re paired with goat cheese… mmmm. I love the sweet smell of the steam when you unwrap their foil. I don’t even mind that my hands will look like an art project for the rest of the day (pro tip: feta juice takes it right off).

A few more things you should know about beets:

  • To steam beets, rinse well, pat dry, sprinkle with salt and wrap in foil. The foil-wrapped bulbs can be placed directly on the oven rack. Just be sure they’re wrap doesn’t have any tears of holes.
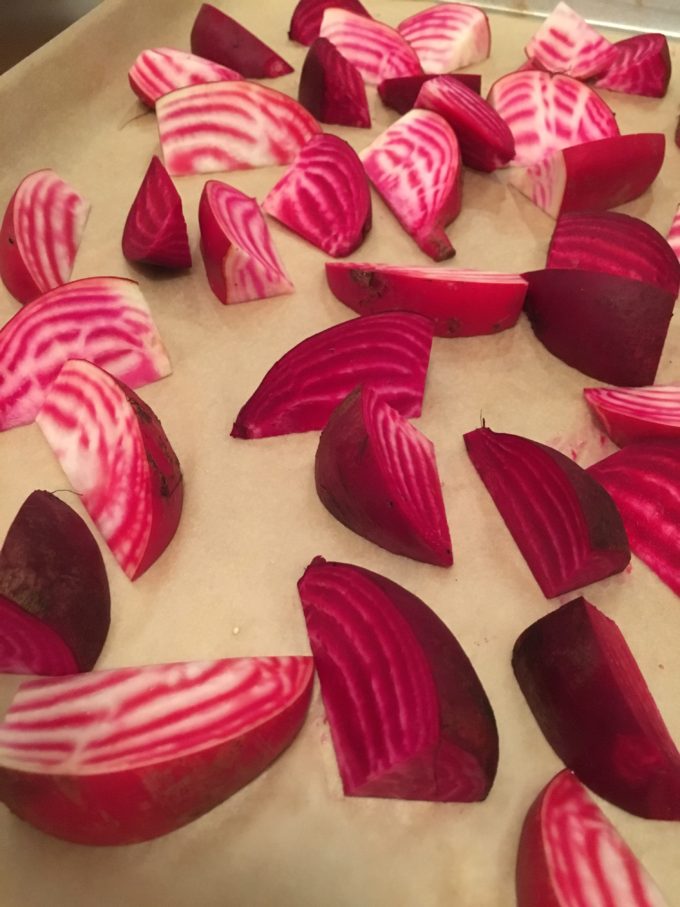
  • They take a long time (sometimes over an hour) – so plan ahead! For steaming it’s important to try to pick beets that are relatively the same size so they’re tender at the same time. If you’re crunched for time, use smaller beets or cut larger ones into wedges with their skin on and roast them just like you would any other veggie with salt, pepper and olive oil on a sheet tray at 425 degrees. The skins get nice and caramelized that way!
  • You can eat them raw: shredded like you would carrots or shaved like you would radish.
  • Keep a loose piece of foil or sheet tray on the rack below the beets to collect any spills, saving yourself from that horrible bubbly, smoky mess on the bottom of your oven.

I could go on and on about my favorite root-vegetables because, truth is, I love them all, these are just the ones I’m craving this week:

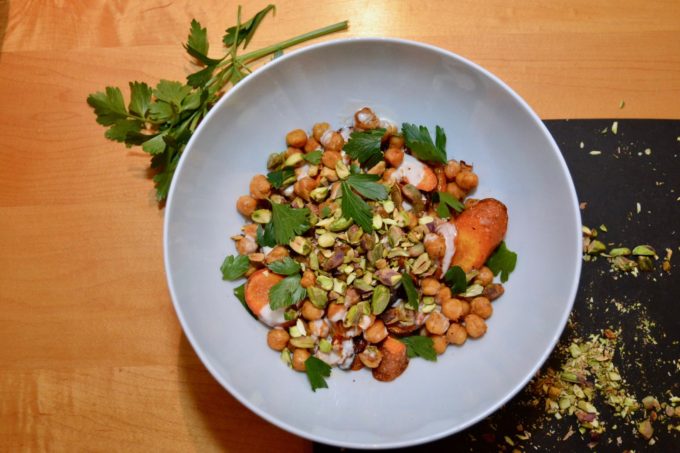
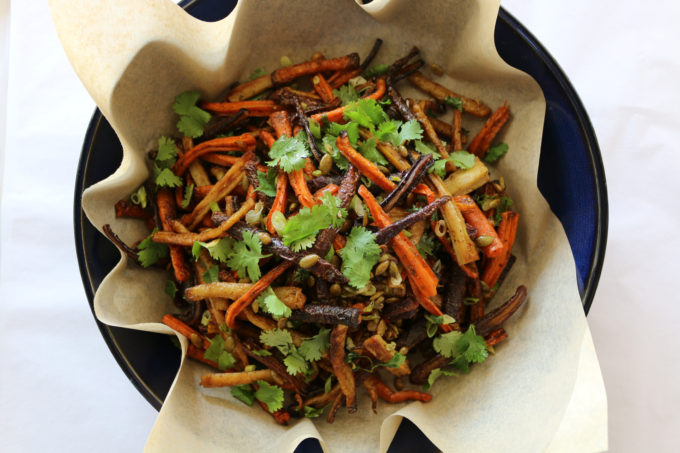
I saw this carrot recipe in the new Smitten Kitchen Cookbook (just hit shelves last weekend and totally worth a peruse) that immediately caught my eye. Because carrots, tahini, crispy chickpeas. But I wanted it to be substantial enough for my whole meal so I decided raw carrots we’re enough and I roasted big chunks instead.

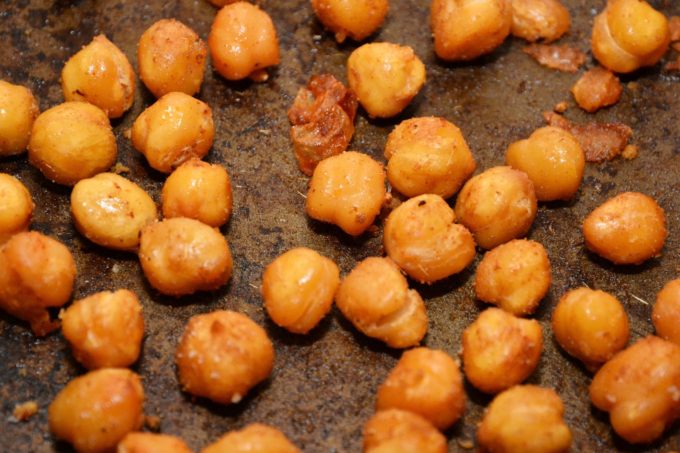
I also added smoked paprika to the chickpeas because it’s delicious.

Carrots

4-5 carrots quartered lengthwise or cut in coins

1 Tbs. olive oil

1 tsp. salt

Pepper to taste

Chickpeas

1 15-oz can chickpeas, drained and patted dry on paper towels

1 Tbs. olive oil

1/2 tsp. salt

1/4 tsp. cumin

¼ tsp. paprika

Dressing

1 medium garlic clove

Juice of one lemon

3 Tbs. tahini

2 Tbs. water, or more as needed

A pinch of salt

Salad

1/4 cup chopped pistachios, roasted

2 sprigs parsley leaves

Roast carrots: Preheat the oven to 425 degrees F. Arrange carrots in a single layer on a large, parchment lined sheet tray. Season with salt, pepper and oil, toss and roast for about 25 minutes, until the carrots are deeply roasted and caramelized.

Chickpeas: Toss chickpeas with oil and seasonings. Spread them on a sheet tray and roast alongside the carrots until crisp and crunchy, about 15-20 minutes.

Vinaigrette: Whisk ingredients in a large bowl until smooth, but not too loose. You may need to add more water to achieve this consistency. Don’t worry this is normal!

Assemble salad: tumble carrots, chickpeas, pistachios and parsley into a large bowl and drizzle with tahini vinaigrette. Enjoy!

Other favorite carrot recipes:

https://cooking.nytimes.com/recipes/1013106-carrot-tahini-soup-with-coriander-turmeric-and-lemon

https://www.bonappetit.com/recipe/bas-best-carrot-cake

https://smittenkitchen.com/2016/05/roasted-carrots-with-avocado-and-yogurt/

Yotam Ottolenghi & Helen Goh’s beautiful book, Sweet, highlights a couple unlikely root vegetable baked goods. Of course the one that seduced me wasn’t the carrot cake, which is a personal weakness, but the beet cake! With spicy candied ginger and tangy cream cheese frosting it’s certainly a contender!
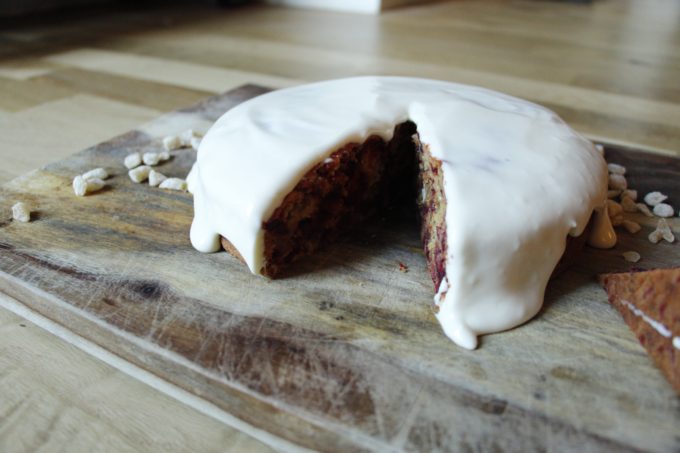
The picture in the cookbook made the frosting look light and fluffy. My results were a little on the runnier side, but still tasted delicious 🙂

Cake

2/3 cup walnut halves

1 2/3 cups all-purpose flour

¾ cup granulated sugar

2 tsp. baking powder

1/4 tsp. salt

2 red beets, peeled and coarsely grated

Finely grated zest of one orange (1 tbs.)

1/2 cup finely chopped crystalized ginger (they instruct you to steep these in boiling water for 15 minutes, however, I skipped this step to create a little more intense flavor)

2 large eggs

¼ cup soup cream

½ cup sunflower oil

Frosting

5 ½ cream cheese at room temperature

½ cup confectioners’ sugar, sifted (plus more if necessary)

1/3 cup heavy cream

2 1/3 inch piece of ginger grated into a fine sieve placed over a bowl and the flesh squeezed to extract all the juices; reserve the juice.

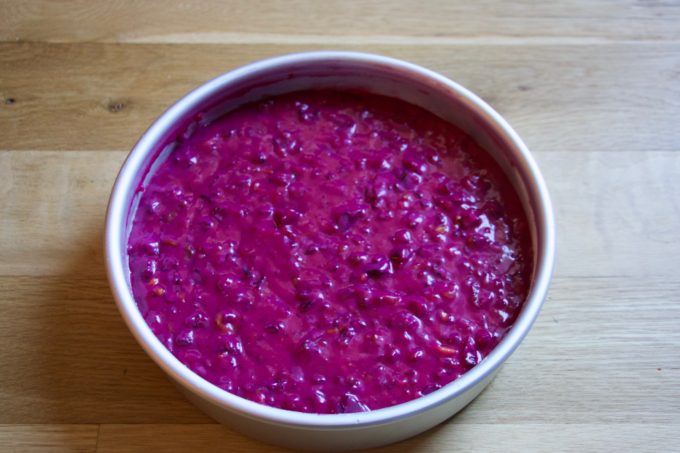
To make cake: Preheat the oven to 350 degrees F. Grease an 8-inch round cake pan and line with parchment paper, then set aside.

Toast the walnuts in a skillet in the oven for 15 minutes.

Place the flour, sugar, baking powder, baking soda and salt in a large mixing bowl and whisk to combine and aerate. Add the beets, orange zest, walnut and ginger, but do not stir.

Place wet ingredients: eggs, sour cream and oil in another small bowl and whisk to combine.

Pour mixture into the cake pan and bake in the middle of the oven for 50-55 minutes or until a tester comes out clean. Remove from oven and set aside to cool for 30 minutes before removing from the pan.

To make frosting: Place the cream cheese in the bowl of an electric mixer with the whisk attachment in place and beat for about 10 seconds until smooth. Add the confectioner’s sugar and beat until well incorporated. Add the cream and beat for about 1 minute, until the frosting is thick and smooth. Add the ginger juice, beat for a few more seconds. If the frosting seems a little loose just add a little more confectioner’s sugar. Once the cake is cooled, frost with an offset spatula and slice to serve!

Ottolenghi stirs in a crushed 1500mg vitamin C tablet to help preserve some of the vibrant pink hue

Other favorite beet recipes:

http://www.feastingathome.com/beet-bruschetta-with-goat-cheese-and-basil/

http://www.greenkitchenstories.com/grilled-beet-burgers/

https://www.loveandlemons.com/beet-hummus/


Happy cooking,

Charlotte

Crispy Tofu Spring Rolls for Summer!

We love getting feedback from all our clients but, I must admit, I get most excited when it comes from our clients’ kids. I love hearing when their kids devoured our roasted salmon or actually finished their plate of veggies. So this month’s video is for the kiddos. There’s one thing that I’m pretty sure most parents can agree on and that’s how frustrating it can be to feed kids. I know from my own experience as a nanny that kids are very strong-willed when it comes to food and if they don’t want to eat it, they will find any excuse not to (feeding their peas to the dog when you’re not looking, chucking their apple slices in a bush on the way to school, etc.).


A big part of our job as private chefs involves accommodating these tenacious mini-clients. At WWE, we encourage our clients to use their imaginations and play with their food, especially the littles. We’re always trying to come up with kid-friendly, hands-on snacks that we can add to the rotation. These spring rolls are among our most successful. They also make for a great afterschool activity. Although it’s technically no longer spring, I’m pretty confident that these spring rolls are actually the perfect summer snack. The tangy peanut sauce is a classic and pairs perfectly with the delicate flavors wrapped up in these rolls. Keep these rice papers on hand and fill them with whatever’s lingering in your fridge or whatever veggies your kids are into.

This video also serves double duty by demonstrating another one of our client faves, kids and grownups alike: crispy pan-fried tofu.

For crispy pan-fried tofu:

  • I like to use extra firm tofu because it’s less likely to fall apart when you’re slicing or break mid-flip in the pan.
  • Drain as much of the tofu liquid as possible by placing the tofu between absorbent paper towels or a clean dishcloth and weigh it downs with anything you have laying around that’s kind of heavy (an extra cast-iron or heavy plate work great). The dryer the tofu, the better the crunch.
  • Slice the tofu as thinly as possible in one fluid stroke. Avoid sawing at the tofu as it tends to crumble if you fuss with it too much.
  • Next heat a skillet on high with a nice layer of high-heat oil (grape seed oil, canola oil, safflower oil…) to avoid too much smoke.
  • Season both sides of each slice of tofu generously with salt and pepper.
  • Working in batches, sear the tofu until a golden crust forms. They should be fairly stiff without much wiggle. This can be difficult to judge. For me, if it feels slimy and slippery when I’m trying to flip it, it’s not ready.
  • Once they’re crispy, drain the excess oil by placing the tofu on a plate covered in paper towel.
  • Serve in a salad, grain bowl, sesame noodle dish or spring roll. You name it.

Spring roll fillings:

  • Tofu
  • Avocado
  • Julienned or grated carrots
  • Julienned or thinly sliced cucumber
  • Julienned or thinly sliced radish
  • Thinly sliced mango
  • Toasted sesame seeds
  • These are just what we had on hand but you can use anything as long as it’s small or thin enough to fit neatly inside.

Spring roll wrappers:

  • You can find these at most health foods stores or Asian food markets.
  • Fill a shallow bowl (we used a pie dish) with cold water.
  • Dip each sheet separately into the water and let sit for 1-2 minutes until the wrapper is pliable.
  • Lay the wrapper flat on a cutting board or clean work surface and allow your little ones to assemble it themselves.
  • Roll it up like you would a burrito. The wrappers are pretty tough so don’t be shy!
  • Or forgot the rice paper wrapper all together and use a leafy green instead.

For dipping sauce:

  • We love a peanut sauce with 1/2 cup peanut butter lots of fresh grated ginger, garlic, a pinch of chili flakes, 1 tsp. toasted sesame oil, 2 Tbs. rice wine vinegar and 1/2 cup water.
  • You may also like a sweet and sour sauce or sweet mustard sauce.
  • Or just plain soy sauce!

xoxo,

Charlotte


SaveSave

SaveSave

SaveSave

All You Need to Know About Pork Tenderloin

Currently sitting at my favorite neighborhood patisserie – nibbling on the best chocolate almond croissant in Park Slope (Colson at the corner of 9th and 6th ave) – piecing together the clips of my first totally solo video project. And it’s starting to feel like a mining operation: pealing away the jumbled parts of my 3-hour, single-take, cut-less footage and jerky tripod adjustments – a testament to the importance of asking for an extra set of hands. However, my favorite part of this whole process of making these videos has been the challenge of putting my film schooling to practice in this new food video domain. It’s not perfect and my standards are much too high but it’s really fun. I love the process of demonstrating a process. Food is a process. It’s practice and it’s putting your knowledge of ingredients and tools to the test. Sometimes it doesn’t turn out the way we envision but when it does the process of getting to that point makes you feel like an expert the next time around. Being confident and accepting the process is the key to success.

This video came about because some folks commented on one of our pork tenderloin Instagram posts, professing their frustration with pan-searing pork and that it never looks like “that”. But, I’ll be honest, neither did mine. It took me a few tries and lots of deep breaths to get it right. Laura and the crew would probably say it was my biggest hurdle. But I’m here to tell you that it is possible! Here are a few tips I picked up in the process 🙂

  • Prepping a pork tenderloin:
    • Pork is best seared, to get that crispy, unctuous crust, then popped in the oven at 425 degrees to finish.
    • First, you must trim off something called the “silverskin”. According to my research, “silverskin is connective tissue that doesn’t dissolve when the tenderloin is cooked, so it needs to be trimmed away” (finecooking.com). Hold it tightly with your fingertips and stick a sharp knife, preferably a boning knife or pairing knife, through to make a thin slit and follow the tissue until it’s removed.

  • The longer you marinate, the better.
    • Next, it’s important to marinate the tenderloin for as long as possible, at least an hour. Although, we all know apple and pork is a winning combo, pork is also great with almost any citrus. Pork absorbs flavors beautifully. You can adjust your seasonings to go along with whatever you’re making.
    • Make sure you strip the pork of excess marinade before you start searing but don’t pour it down the drain just yet! You’ll use it later. You can also add a little something extra to the marinade after you’ve stripped it like honey or agave, sriracha, anything that is likely to burn in the pan while it sears. We added honey to the recipe in this video and created a sweet glaze.
    • (Bonus tip: you can also make extra marinade before you add the pork to use as salad dressing!)

  • How to get the perfect sear every time:
    • When you’re searing pork, or anything for that matter, you want to make sure your pan is really really hot. You can test this with the water splash test, if it sizzles you’re ready to go. Add the oil. This can be anything you have laying around but if you’re getting really technical, you’ll want something with a “high-smoke-point” (things like grapeseed oil, safflower oil or canola oil). Make sure it covers the whole surface of the pan, then carefully layer the meat on top. It will splatter so watch out!
    • You’re going to create an even sear around the whole tenderloin so it’s crispy all the way around. To do this, you’ll roll the pork toward (or away) from you, allowing the pork to get a nice sear on each roll. On the last roll just turn, spread with your excess marinade or glaze and pop it in the oven.

  • Finish it off in the oven.
    • Oven timing is tricky here because oven temps vary, pork girth vary, and different pans transfer heat differently. Before you give up, there’s an easy solution. Welcome meat thermometer! Check the pork after about 6-8 minutes. Stick the thermometer in the thickest park of the meat. You want it to read 135-140. It will finish cooking while it settles.

  • Let it rest!
    • Probably the most important tip we can give you is to let it rest. Make sure the pork rests for at least 10 minutes – just enough time to whip up your salad or strain your rice. This will ensure juicy pork. Even if you think you overcooked it, it will still be delicious and juicy if you allow the meat to rest.
  • Save le jus.
    • The final tip I have is to pour the juices that pool on your cutting board over the meat. It’s a trick I learned long ago and will never serve meat to another living soul without it. Perhaps the simplest way to transform a piece of meat into a savory chef-d’oeuvre.

Our go-to pork marinade ingredients and pairings:

As shown in the video:

  • Roasted pork tenderloin with lots of fresh thyme, rosemary, garlic, salt + pepper and honey to finish.
    • Paired with delicate Boston lettuce, shaved radish, lightly blanched green beans, and brown rice with a lemon-dijon vinaigrette
  • Roasted pork tenderloin with orange zest, garlic, grainy Dijon mustard and honey to finish
    • Paired with roasted sweet potato wedges, quinoa and simple arugula salad with citrus Dijon vinaigrette
  • Laura’s Cooks vs. Cons pork tenderloin: http://whatweeat.nyc/cooks-vs-cons-behind-the-scenes/

BYO Hawaiian Bowls

Vegetarian? Vegan? Gluten Free? Nut allergy? Onion phobia? These days being a private chef can be challenging. Each week we work hard to dish out new and inspired menus while keeping careful track of everyone’s allergies, intolerances and preferences. It’s not easy and our build-your-own-bowls have quickly become our saving grace and inadvertently our biggest sensations. We prep all the components into separate serve-ware, giving our clients full reign. It’s up to them to decide what they’re in the mood for and don’t think we’re not curious. We really envy that fly on the wall. I mean, it must be kind of crazy coming home to a counter full of mise-en-place and not know what the chef envisioned for the end result. BYO night resembles a quintessential taco night (always my favorite dinner growing up) with all the fixings laid out for you to pick and choose.

Obviously, we know what we would do and it takes all the strength in the world to keep from sprinkling the herbs in with the salad or smearing the garlicky yogurt on the bottom of the platter. We also know it’s true that this is your meal at the end of the day and maybe you had cheese for lunch or you’re just not feeling that tahini drizzle on your sweet potatoes. By far the best news we get is when one of our client’s kids changes their mind about salmon or roasted carrots and I have to think that the BYO is responsible for these little victories.

We also have to think that maybe our clients want some direction. I know from my own life that my BYO dinners usually turn into a show and tell. My boyfriend will say, “I want to see how you do it”. And I can’t tell you how many times I’ve explained a menu to a friend or family member forgetting that BYO isn’t a commonplace acronym. Prompting my third recipe-video, I wanted to show how I would construct my own bowl for our clients who are used to this lingo and also respond to the BYO quarries I get from everyone else. We gathered at Laura’s for our usual Friday staff lunch and spent the afternoon prepping ingredients like we would for our clients. Then, with cameras rolling, I constructed my bowl.

A behind-the-scenes look at the BYO Hawaiian Bowl shoot

This bowl, in particular, was taken from one of our weekly menus and happened to be an experiment. As chefs, we’re constantly on the hunt for unique ingredients to broaden our directory of ingredients and culinary repertoire and plantains were one such, exotic thing that sparked our curiosity. It was the first week we had our first glimpse of spring and we were all craving something light and tropical (or maybe a vacation :)). This bowl was the brainchild of our chief menu strategist, Rian, and, lets be honest, no one doubted it’s viability. In the end in was fun to built our own bowls and admire each other’s different plated creations, not to mention walk in our clients shoes for an afternoon.

By far the best part about BYOs is the versatility. If the store doesn’t have mangos, pineapple would make a great substitute. The opportunities for experimentation and adaptability are endless. This is the first BYO video, but it’s certainly not the last. Stay tuned for more BYO demos!

With love, Charlotte.

BYO Hawaiian Bowls (as they appear in the video):

Sticky sushi rice, baby spinach, crispy pan-fried salmon (alt: pan fried tofu or pork carnitas), pan seared plantains, roasted carrots, sliced mango, shaved radish, cucumber moons, blanched edamame, sliced avocado, scallions + cilantro, mandolined jalapeños, tangy cilantro-coconut dressing, toasted sesame seeds (black and white) + pepitas and lime zest

Some other recent BYO favorites that might peak your interest:

BYO Super Green Spring Bowls

Fried or poached eggs, boston + butter lettuce, farro, quartered radish, blanched peas, blanched asparagus, blanched sugar snaps, avocado, cucumber moons, toasted hazelnuts, whipped feta, scallions + basil + mint and lemon + thyme vinaigrette

BYO Steak Cobb Salad Bowls

Seared and sliced steak of choice, brown rice, crumbled bacon, romaine+watercress+endive, cherry tomatoes, avocado, pickled red onion, radish, crumbled blue cheese, hard boiled eggs, crispy chickpeas, roasted sunchokes (also called Jerusalem artichokes – http://whatweeat.nyc/jerusalem-artichokes/), cucumber moons, parsley + chives and red wine-dijon vinaigrette

BYO Glazed Korean Meatball Bowls

Korean glazed meatballs (alt. tofu), butter lettuce, brown rice, roasted shiitake mushrooms, sauteed baby bok choy, blanched broccolini, avocado, cucumber, toasted black and white sesame seeds, scallions + cilantro, ginger dressing)

BYO Honey-Dijon Roasted Pork Tenderloin Bowls

Fluffy quinoa, thinly sliced apples, roasted sweet potato cubes, arugula + baby spinach, dried cranberries, cucumber, avocado, goat cheese, mint, toasted slivered almonds, apple cider vinaigrette

Feel free to ask about any of these recipes or preparations in the comments section!