MY INAUGURAL ZOOM COOKING CLASS

GUYS! Everyone! I am so excited to officially invite you to my very first Zoom cooking class. The class will be this Sunday, May 22 from 4-5:30pm ET at a cost of $40 per household. Cooks of all skill level are welcome. Here is our menu…

Jalisco Express

Tangy Roasted Salmon and/or Tofu

Spring Caprese

Citrus Farro Salad with Toasted Walnuts and Olives

Citrus Olive Oil Cake

Our menu will celebrate the official transition into spring. To me, that transition happens once temperatures remain above 60 degrees and real spring produce shows up at the farmers markets, not when the calendar tells us its spring in March. We are just getting there here in the North East.

All dishes (even our cocktail!) include bright, verdant flavors – think lots of citrus, green vegetables and fresh herbs. We’ll start with a Jalisco Express – a tequila cocktail that’s the tiniest bit spicy from the addition of a jalapeno, and fresh from cucumber and basil. It’s just as yummy made virgin with soda water for those who don’t want to imbibe. We’ll make Tangy Glazed Salmon (and/or tofu) with orange, Dijon mustard and honey and discuss the many directions you can take it by switching up your glaze ingredients. To serve alongside of that, we’ll prepare my Spring Caprese, a mix of perfectly blanched spring vegetables layered with top-quality mozzarella, basil and mint; and a flavorful farro salad tossed with lemon-shallot vinaigrette, crunchy toasted walnuts and salty olives. And don’t forget about dessert! We’ll whip up a very forgiving citrus olive oil cake that gets better as it sits. You will be enjoying the fruits of our labor for days to come.

Cook along with me and enjoy the meal with family or friends or pack it up and enjoy it for lunch throughout the week. Register for the class here and I will invoice you via Venmo or Quickbooks. Once paid, I will approve your registration and send you more information about the class including a grocery list, our recipes and answers to what I anticipate to be common questions. 

This is something I have wanted to do *forever* and hope I will see you there. Thank you so much for your support!

xx    Laura

STRAWBERRY & YOGURT LOAF CAKE

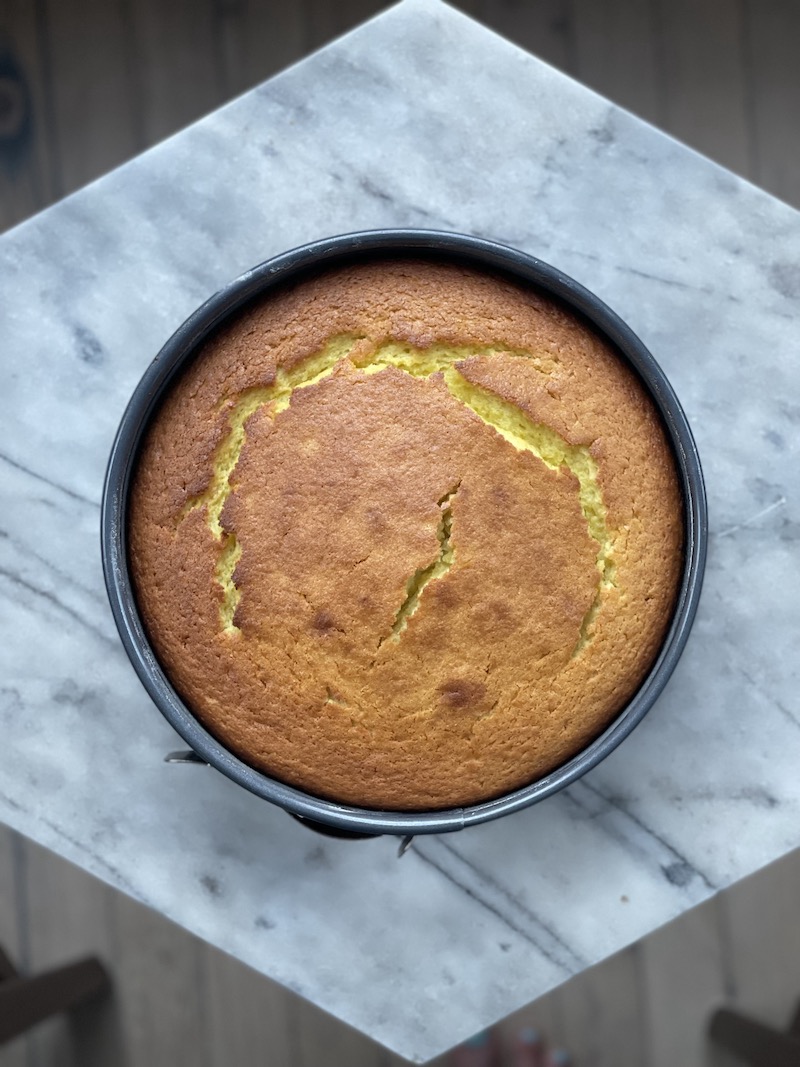
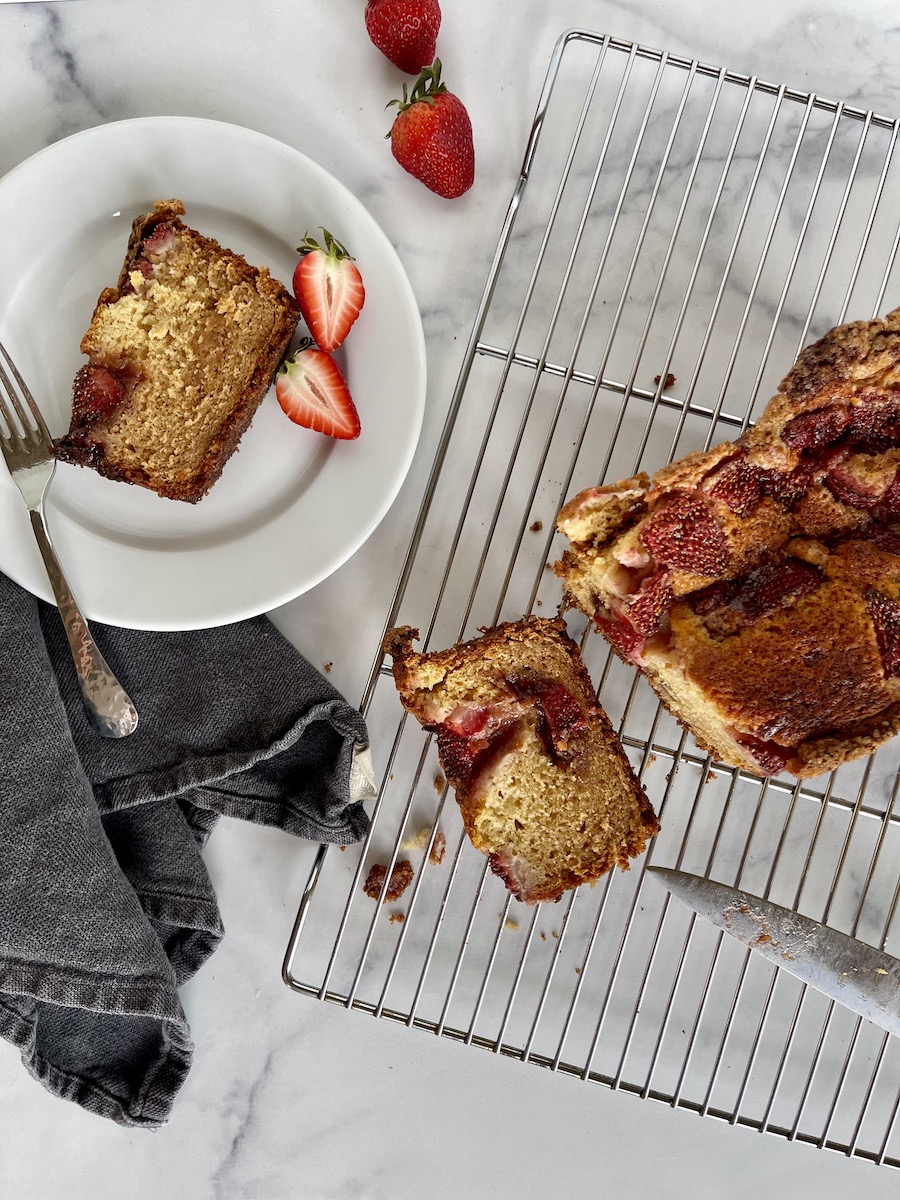
This Strawberry and Yogurt Loaf Cake is my latest obsession. While the yogurt batter itself is only barely sweet, the cake is baked in a crust of turbinado sugar and its top is dolloped with both super sweet strawberry jam and fresh strawberries. As the cake bakes, some of the jam falls to the bottom, some gets suspended in the middle and some stays right on top. The cake around that jam becomes a little custardy. So much to describe here but, really, you’re going to have to trust me…make this cake.

In addition, there is something about *loaf* cakes that speak to me. Like, if you give me the option of a slice of a loaf versus a traditional cake, I’ll always choose the former. My ranking is loaf cake > round cakes > sheet cakes > cupcakes. I’m sure that hierarchy is controversial. Anyone with me here?

Origin Story

This recipe in a combination of my own Strawberry Snacking Cake, Alison Roman’s Chocolate Banana Bread (that’s where I got the genius idea of lining the loaf pan with sugar), Smitten Kitchen’s Strawberry Summer Cake (another perfect recipe if you don’t agree with my cake shape hierarchy), and Julia Turshen’s Greek Yogurt Cake with Jam.

As an amateur baker with an amateur understanding of baking science, it took some tweaking to get right. (Read: I had to clean the bottom of my oven more than once while developing this recipe.) I did that hard “research” so you don’t have to.

Serving Suggestions

I hope this Strawberry and Yogurt Loaf Cake finds its way into your baking repertoire. It deserves center stage after a dinner party topped with whipped cream or vanilla ice cream, or a place on your brunch table served with plain yogurt and fresh fruit. Guests will want the recipe and you’ll know where to send them.

As always, tag me in your food photos on Instagram @whatweeat.nyc and report back here.

Happy cooking!

STRAWBERRY AND YOGURT LOAF CAKE
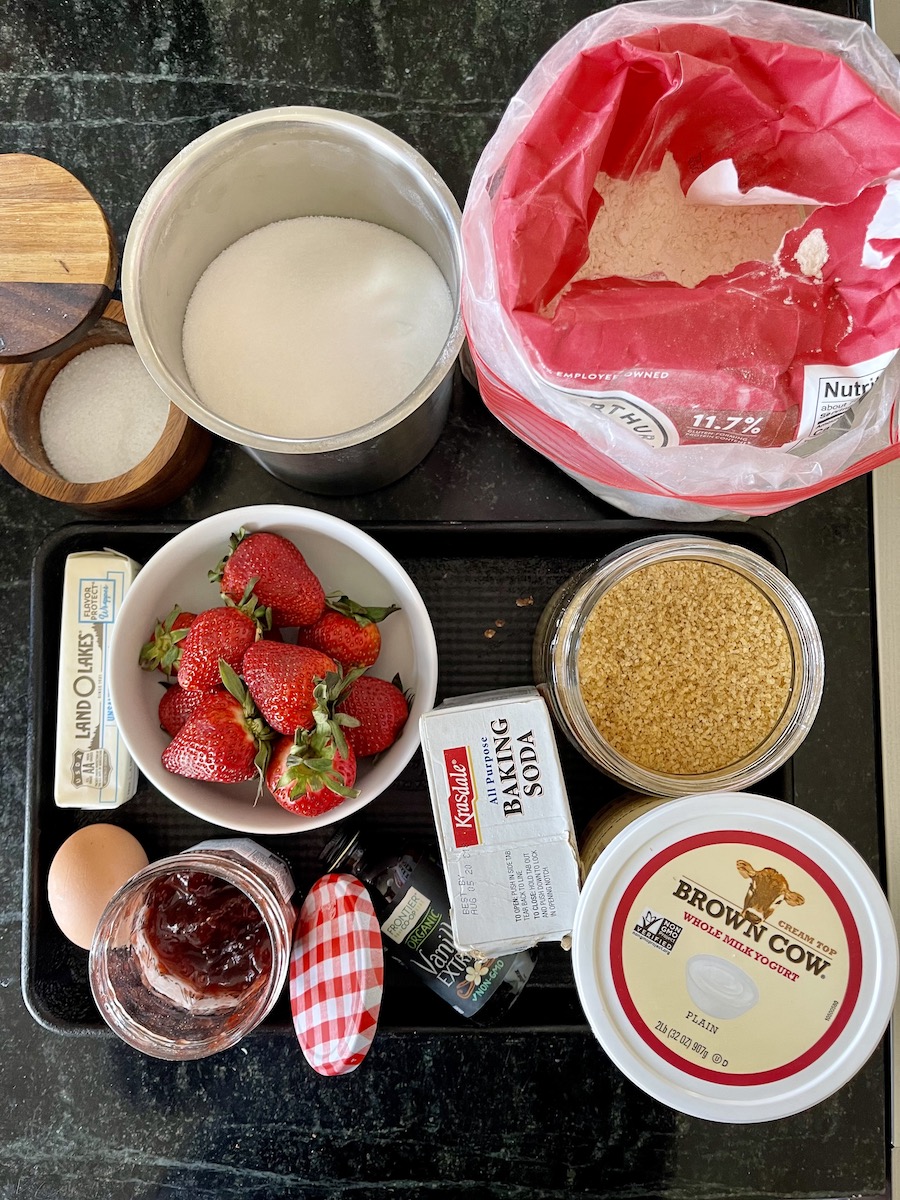
Ingredients
  • 1/4 cup turbinado sugar (aka demerara sugar or sugar in the raw) plus 1 tbsp to top strawberries
  • 6 tbsp butter plus 1 tbsp for coating loaf pan, room temp
  • 1/2 cup granulated sugar
  • 1.5 cups all-purpose flour
  • 1 tsp baking soda
  • 1 tsp kosher salt
  • 1 tsp vanilla extract (you can be heavy handed here)
  • 1 egg
  • 1 cup plain, whole milk yogurt
  • Very scant 1/2 lb strawberries, hulled and halved or quartered (little less than half a box, or ~1.5 cups)
  • 1/4 cup strawberry jam
Method
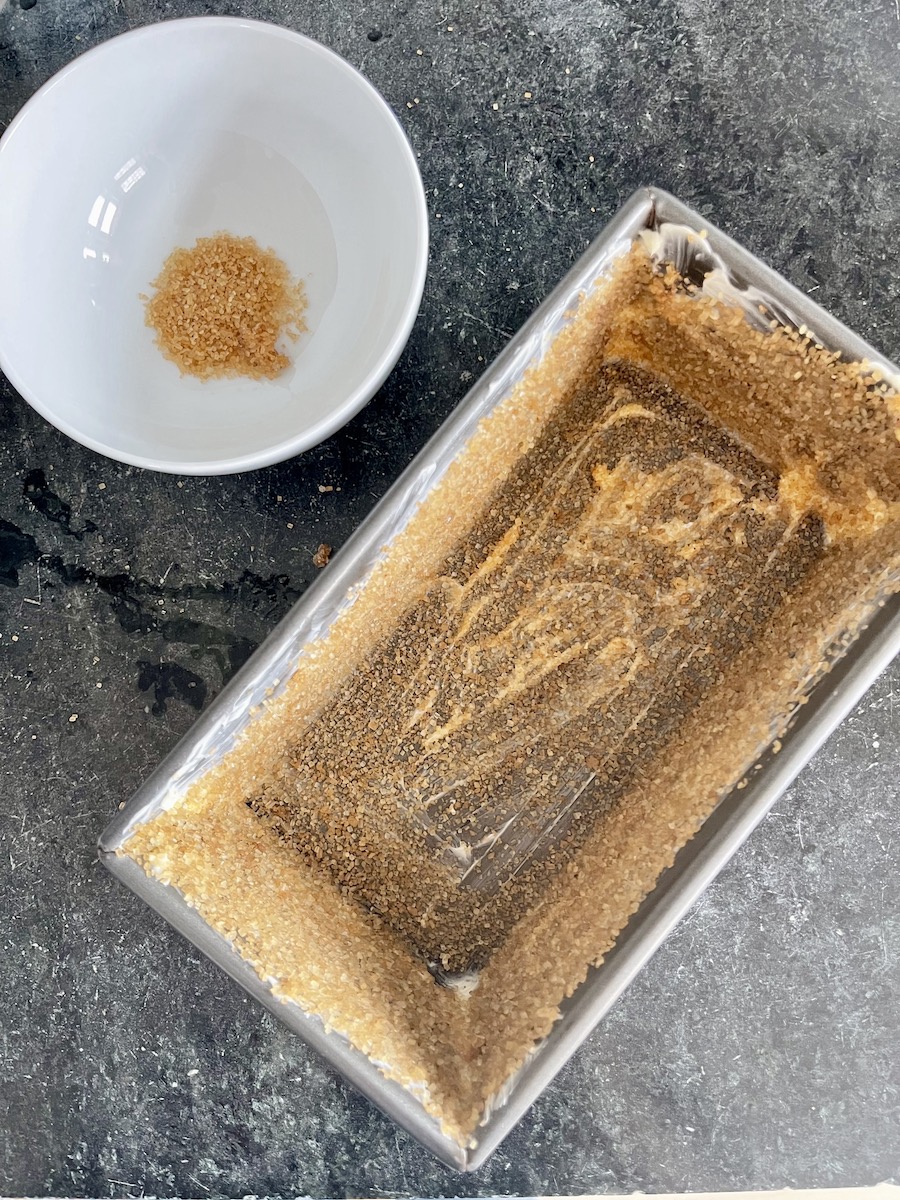
  1. Preheat the oven to 350 degrees.* Generously butter a 9 x 5-inch loaf pan. Sugar the inside of the pan with 1/4 cup of the turbinado sugar, tapping out excess. Get right up to the lip of the pan because the cake will rise to the tippety top.
  2. Using a stand mixer or hand mixer**, beat the butter and sugar together for ~5 minutes until light in color and fluffy. Add the vanilla extract and eggs. (Reserve yogurt until end.)
  3. Meanwhile, whisk together the flour, baking soda and salt. Hull and halve the strawberries.
  4. Add the dry ingredients to the wet ingredients and mix until just incorporated. Using a spatula, fold in the yogurt until fully incorporated but not over mixed.
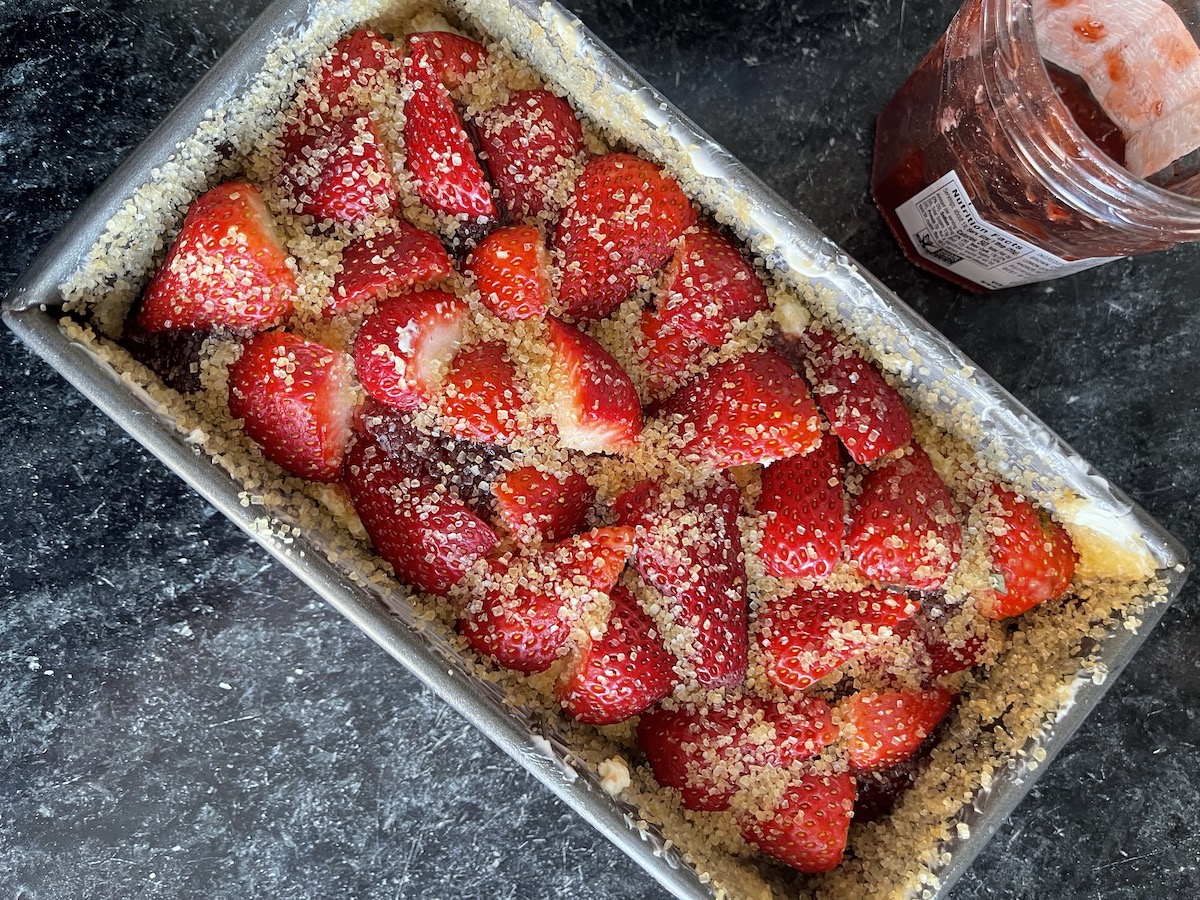
  5. Pour the batter into the prepared loaf pan, smoothing the top. Use a small spoon to dollop the strawberry jam over the batter, keeping the jam more towards the center of the cake than to the sides. (If you push it to the sides, it’s a little hard to turn out the cooled cake because the jam gets sticky.) Use the back of spoon to swirl it here and there. It doesn’t have to be perfect.
  6. Finally, top with the halved strawberries, Tetris-ing them in so every square inch of the top is covered. If you have extra strawberries, those are your chef’s treat. Sprinkle the top with the last heaping tablespoon of turbinado sugar.
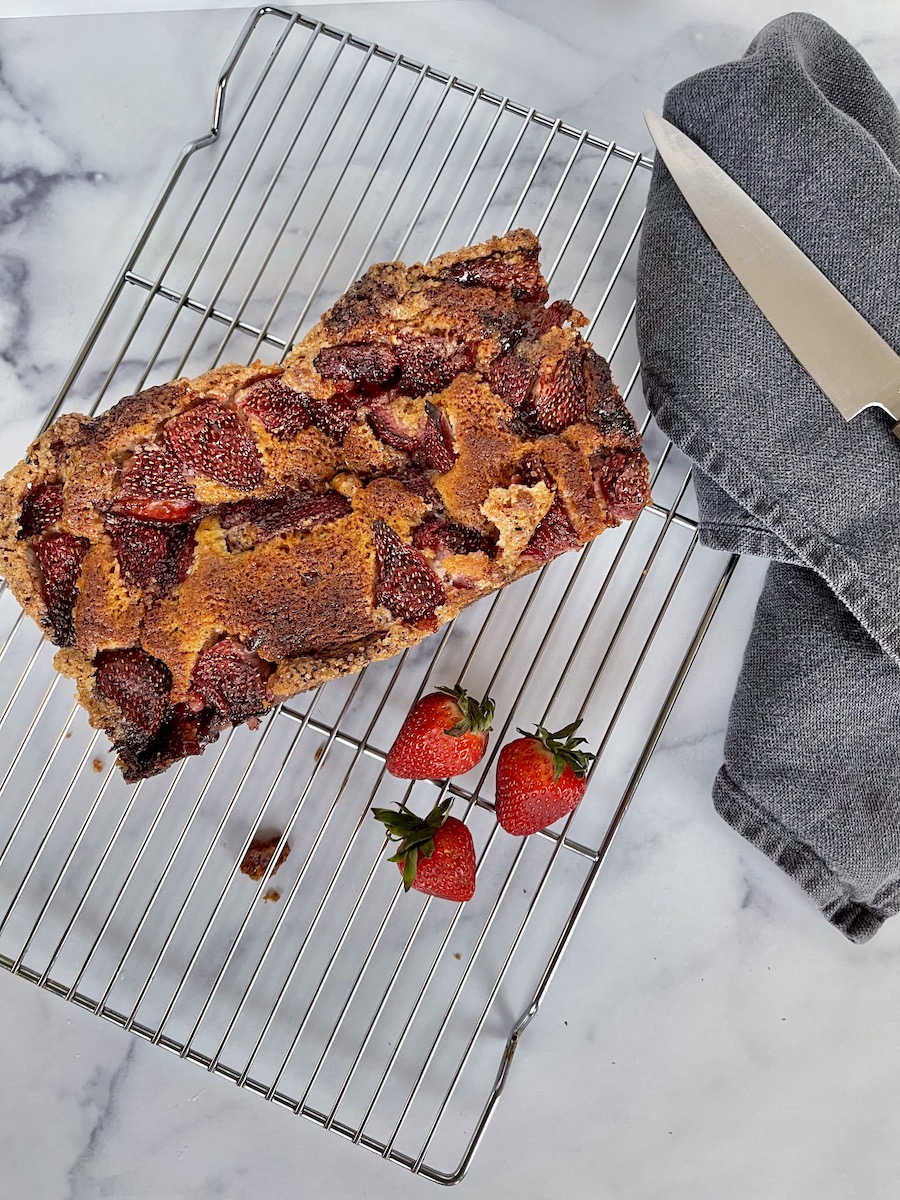
  7. Place loaf pan on a sheet tray (just in case) and bake until the sides of the cake start to pull away and the cake is baked through in the center, about 80-90 minutes. It should spring back slightly when pressed in the center.
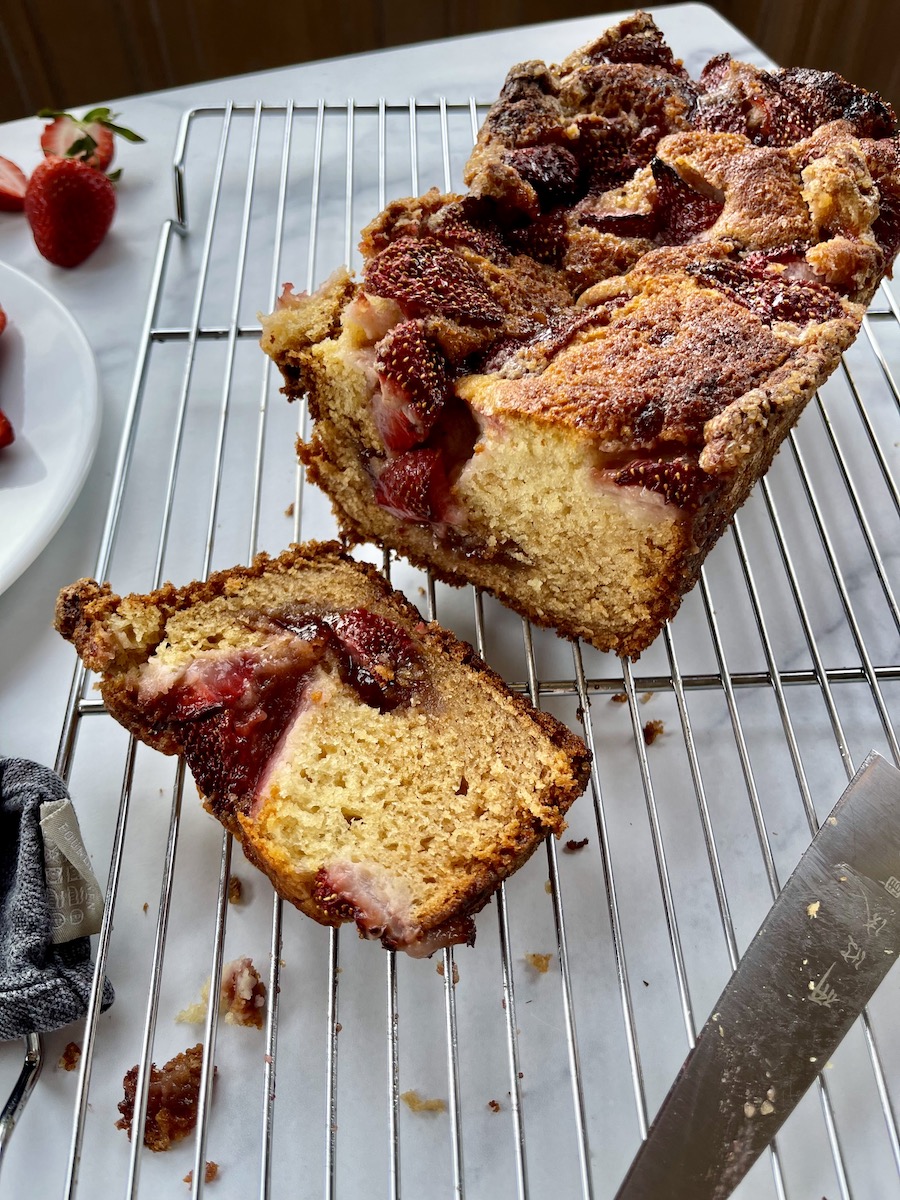
  8. Cool on the stovetop or on a cooling rack for 1 hour. Use a knife to encourage the sides away from the pan. It will be a little sticky here and there but should eventually pull away. Turn out a place on a serving platter to cool for another 30 minutes before slicing.**
  9. The cake is delicious for a couple of days in an airtight container so can be made ahead. Mine has never lasted more than two days.

Serves 8-10 people

*I use my convection setting here. If you don’t have one, the cake might take closer to 90 minutes to be fully cooked.

**You can do this by hand but you really want to aerate that butter (make it extra fluffy) and this is MUCH easier with some equipment.

***To be honest, I’ve of course turned this out and sliced this within 30 minutes of it coming out of the oven. We’re just talking “ideally” here.

Want more dessert recipes?

CRISPY, STICKY TOFU STIR-FRY WITH BROCCOLINI AND GREEN BEANS

The secret to crispy tofu is all in the prep. Some people swear by freezing and thawing tofu but my tried and true method is to give it a good press, then cube or crumble it, season it with salt and pepper and toss it with cornstarch. From there, all it needs is a short stint under high heat to get crisp on the outside while remaining bouncy and moist within. 

Use that crispy tofu however you like – as a topper for a kale caesar, on top of sesame noodles, dipped in BBQ sauce, etc. My favorite way to use it is in flavorful stir-fry like this. While this stir-fry is best hot from the stovetop, I usually double the recipe and enjoy it for lunch throughout the week.

Crispy, Sticky Tofu Stir-Fry with Broccolini and Green Beans

Ingredients

For tofu….

  • 2 1-lb packages tofu 
  • Kosher salt and freshly cracked black pepper
  • Granulated garlic (optional)
  • 3 tbsp cornstarch
  • 2 tbsp neutral oil like grapeseed, vegetable or canola (olive oil is fine)

For sauce…

  • 3 tbsp water
  • 2 tsp cornstarch  
  • 4 garlic cloves, minced
  • 1-2 inch piece of ginger, skin removed and minced
  • 5 tbsp soy sauce (1/4 cup + 1 tbsp)
  • 4 tbsp honey (1/4 cup)
  • 6 tbsp rice wine vinegar (1/4 cup + 2 tbsp)
  • red pepper flakes or favorite hot sauce like chili paste or sriracha to taste (I left out for my kiddos’ sake)

For vegetables…

  • 2 tbsp neutral oil (suggestions above)
  • 2 bunches broccolini, edges trimmed and sliced in half lengthwise if stalk is thick 
  • 1 lb green beans, ends trimmed if necessary
  • Salt and pep
  • 1-2 tbsp sesame seeds

To serve: rice of choice, fresh cilantro, lime wedges

Method
  1. Wrap tofu in paper towels or a clean kitchen cloth and press under something heavy like a cast iron skillet for as long as you have – overnight or even 10 minutes. Preheat oven to 425 (on convection if you have it).
  2. Cut pressed tofu into 1-2 inch squares or rectangles, or crumble by hand and place on a parchment lined sheet tray. Season generously with kosher salt, freshly ground black pepper and granulated garlic. Then sprinkle with the cornstarch and toss, toss, toss. It will seem like a lot but will eventually stick to the tofu. Drizzle with neutral oil and toss again. Roast for 25-30 minutes, flipping after the first 15 min. The tofu should be nice and crisp. 
  3. Make stir-fry sauce by mixing all ingredients together.
  4. Place large skillet over high heat. When piping hot, add the oil, vegetables and a pinch of kosher salt. Let them get charred on one side for about 4-5 minutes, then give them a good toss and leave them alone again to get charred on a second side. 
  5. When the veggies are cooked to your liking, turn the heat down to medium/low, add the tofu, sesame seeds and the stir-fry sauce. Toss, toss, toss again until the sauce has reduced and it is glossy and sticking to the vegetables. Serve over your rice of choice with cilantro and lime wedges.

Serves 6 people

Prep ahead – Make the stir-fry sauce a day ahead, prep your veggies up to a few days in advance, and press your tofu a day ahead. You can even cook the tofu and stir-fry the veggies a few hours ahead, but wait to combine the veggies, tofu and sauce until the last minute. This ensures the tofu is as crisp as possible. I still enjoy this stir-fry as leftovers but it is best enjoyed right away.

(Want another tofu recipe? Try this one for Crispy Tofu Spring Rolls!)

SMOKY TOMATO AND CHICKPEA SHAKSHUKA

We are in the no man’s land of seasonal cooking in the northeast. I am totally over traditional winter fare and root vegetables but there is nothing green and local in sight. This leaves me with two options: fake it out and settle for supermarket asparagus and the like from California or Mexico, or turn to more flavor-forward, globally-inspired cuisine like this Smoky Tomato and Chickpea Shakshuka.

What is Shakshuka?

Apparently, the literal translation of Shakshuka is “all mixed up.” Don’t you love that? It is a popular Israeli breakfast with North African origins that traditionally consists of eggs baked in a tomato-y, peppery, oniony sauce. It’s deliciousness explains why it has spawned endless variations, including those with Mexican, Italian and Indian influences. While I would be psyched to have this for breakfast, I most often enjoy Shakshuka for dinner.

About this Recipe

The saucy base for my Smoky Tomato and Chickpea Shakshuka is actually an offshoot of these slow-roasted tomatoes from my Winter Caprese. I use my oven set low, a casserole dish and plenty of olive oil to gently stew a mixture of canned tomatoes, chickpeas, bell peppers, garlic and olives spiced up with red pepper flakes and smoked paprika. This recipe takes time (2 hours + a few minutes to bake the eggs) but almost no effort or baby sitting. It is rich, intensely flavorful and vegetable and protein-packed.

Even without the eggs, the stewed ingredients are a perfect side or entree all on their own. But this can’t be Shakshuka without them. So right before dinner, I bump up my oven temp, nestle in a few raw eggs and crumble over some feta cheese. In just a few minutes in the hot oven, the eggs gently poach in the liquid, absorbing all of the mix’s vibrant flavor. The sweet spot is when the egg whites are just set but the yolks are still runny. That way the yolks impart their own magic back into the sauce.

Make It Yours

  • Serve this Shakshuka over Israeli couscous, fregola, rice or a whole grain like farro, or scoop it up into warm naan, pita or your favorite bread.
  • A simple cucumber and red onion salad would be a great (but unnecessary) accompaniment.
  • Sometimes I serve this with big dollops of whole milk Greek yogurt as well.
  • As mentioned above, feel free to leave out the eggs if you are vegan. The vegetable-chickpea mixture is a complete meal on its own.
  • Add in another good slow roasting vegetable like summer squash or zucchini at the start, or fold baby spinach into the cooked vegetable-chickpea mixture before nestling in the eggs.
  • You could swap the chickpeas for a white bean like cannellini or butter beans.
  • Leave out the olives if you aren’t as obsessed with them as I am!

I hope you take this dish and make it yours. If you do, report back here and post a photo on Instagram tagging me @whatweeat.nyc. I love to see your creations!

xoxo

SMOKY TOMATO AND CHICKPEA SHAKSHUKA

Ingredients
  • 1 32-oz can whole peeled tomatoes, drained and torn apart (seeds discarded)
  • 1 16-oz can chickpeas, drained
  • 8 garlic cloves, smashed and skin removed
  • 2 bell peppers (orange, yellow) cut into strips
  • 1/2 c evoo
  • 1.5 tsp smoked paprika
  • 1 tsp kosher salt
  • Pinch red pepper flakes (or more to taste)
  • Handful castelvetrano olives, pitted and roughly chopped
  • 6-8 eggs
  • 2-4 oz crumbled feta
  • Kosher salt and freshly cracked black pep 
  • Red wine vinegar or sherry vinegar (really any hit of acid – lemon or lime juice would also be nice)
  • For serving: couscous, rice or other grain or pita and fresh cilantro/mint/basil
Method
  1. Preheat the your oven to 300 degrees. Place the drained and torn tomatoes, drained chickpeas, bell peppers, and smashed garlic in the bottom of a roasting dish that will fit them all very snugly. Top with 1/2 cup evoo (they should be swimming a bit), 1.5 tsp smoked paprika, 1 tsp kosher salt and as much red pepper flakes as you like. (I only used a small pinch in the hopes my littles would enjoy this…no luck so should have added more!). 
  2. Roast for one hour, remove from oven, gently stir and add in the castelvetrano olives. Return to the oven for a second hour. (FYI, stop right here and enjoy this with flatbreads for scooping or over a grain if you’d prefer to keep this meal vegan.)
  3. Bump up the oven heat to 425.
  4. Make 6-8 little nests in the roasted vegetable mix using the back of a spoon and crack 6-8 eggs into the wholes. Crumble the feta here and there around them. Bake for 8-12 minutes, just until the whites are set. Check every minute or so after 8 minutes because they can go from pretty raw looking to totally cooked through quickly. You are looking for your yolks to remain jammy.
  5. To finish, sprinkle over a hit of acid (red wine or sherry vinegar or lemon or lime juice), top the eggs with a little Maldon salt and freshly cracked pepper. Serve over something like Israeli couscous, fregola, rice, or any whole grain or with warmed pita or naan. Offer a bunch of fresh herbs like cilantro, mint and/or basil alongside. Enjoy!

Serves 4-6