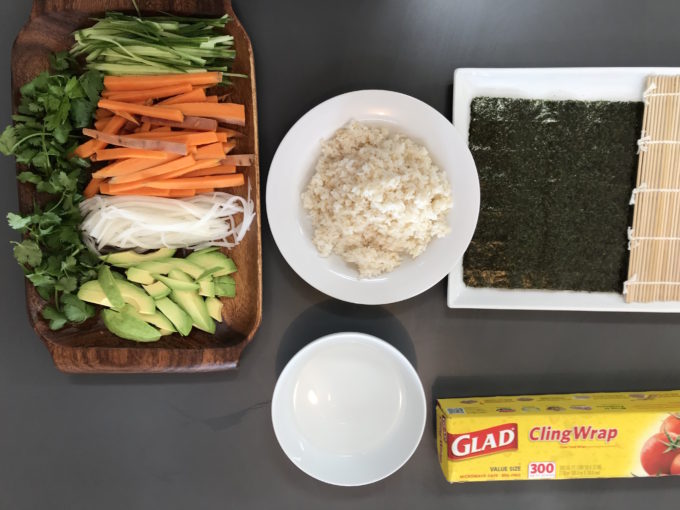
One of my favorite things about cooking is playing with my food. Composing a salad, the perfect toast or (in this case) sushi, allows me to have fun each step of the way! For some, making your own sushi can sound daunting, but it’s actually simple. You don’t even need a sushi mat to make it (although it helps).
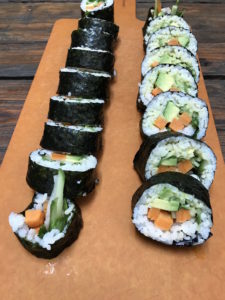
In this recipe, I made a vegan sweet potato and avocado sushi roll. Sushi is versatile, so play up your favorite flavor combinations! For the gals at What We Eat, we constantly make many variations of a carrot and avocado salad. So, in light of that inspiration, here is what we came up with!
What you’ll need:
A clean dish towel
Plastic wrap
A bowl of cold water (to help the rice not stick to your hands)
Sushi mat
Ingredients
Nori sheets
2 cups sushi rice, cooked and cooled with a splash of seasoned rice vinegar
Julienned Vegetables of choice (I did sweet potato, cucumber, daikon, avocado, cilantro)
Method:
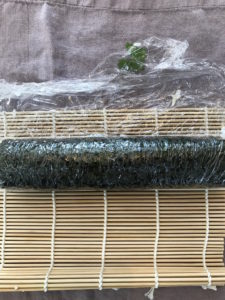
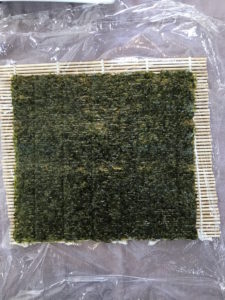
Place a big square of plastic wrap on top of a sushi mat and place on top of a dish towel. (The towel is there to help with the mess). Place a single piece of nori on top of the plastic.
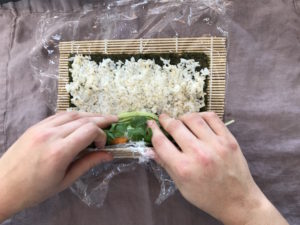
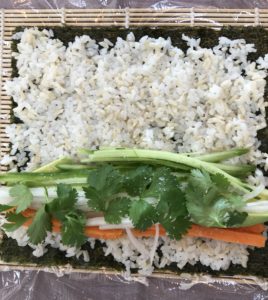
2. With wet hands, place a decent size scoop of the rice onto the nori and press down until even thickness throughout. The water will help the sushi rice to not stick to your hands. Life hack!
3. Add vegetables of choice in a straight line about ⅓ of the way in. Sprinkle with a bit of salt and top with cilantro.
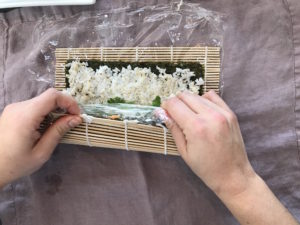
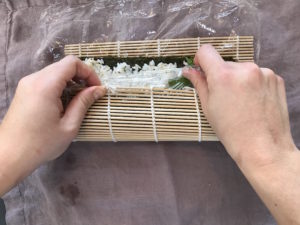
4. Now the fun part! Using the sushi mat and plastic as a guide, tightly roll the sushi. Make sure the pressure is even when you roll to help prevent lumps. (Note: Chef hands in dire need of a paraffin treatment!!)
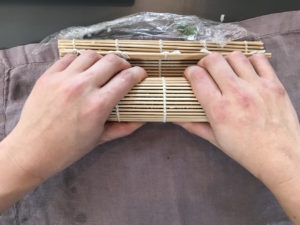
5. Allow to sit for 10 minutes rolled in the plastic before cutting.
6. Slice sushi into 8 pieces and enjoy dipped in your favorite sauce.
After a week eating my way through Italy, then an indulgent Thanksgiving holiday with family in New England, I was ready to be return to my own kitchen in Brooklyn on Sunday.
It’s funny that the same reason I crave vacation, namely to bust out of my well-worn routines, is the same reason I can’t wait to get home.
Because I cook for a living, being fed by others for a sustained period is heaven. No menu planning. No grocery shopping. No cooking. No dishes. Don’t get me wrong, I love what I do but we all need a break.
Before I leave, I obsessively peruse the internet, reach out to friends and read through favorite travel guides to discover the best of what’s to eat wherever I go. Then, with every delicious bite at every carefully selected restaurant, it’s like I’m consuming a little bit of that chef’s culinary point of view.
But there comes a time when I am ready to eat my food again. To return to the meal routines that work for me. Namely, meals that revolve around vegetables.
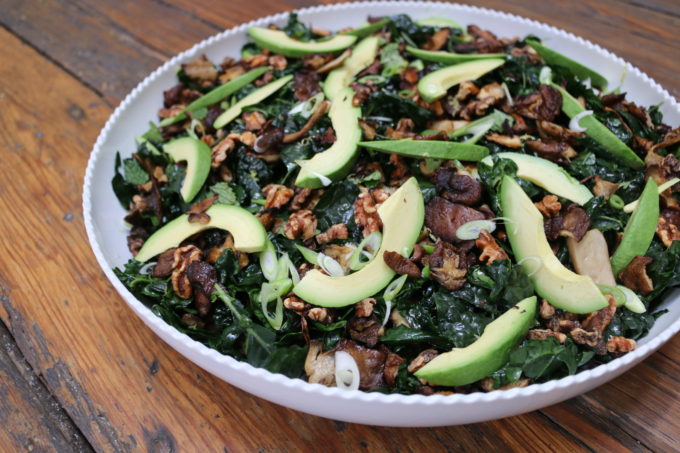
The very first thing I made when I got home was this massaged lacinato kale, roasted wild mushroom and avocado salad. It touches on all of the elements of a crave-worthy vegetable dish: ingredients that are seasonal, both raw and cooked, and vibrantly colorful, and that provide contrasting textures, a little indulgence and a few surprises.
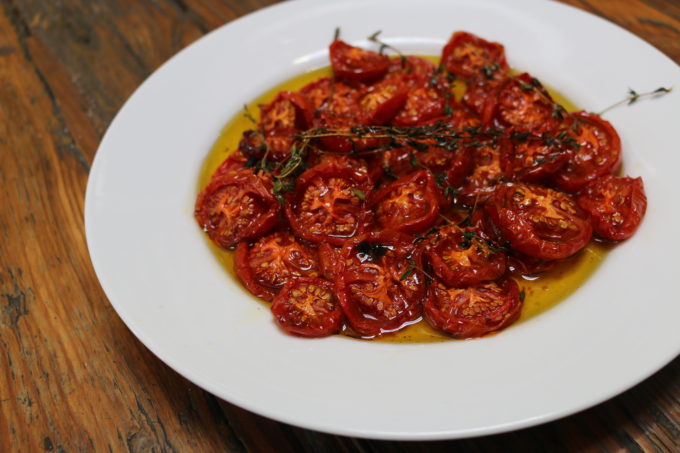
Both kale and mushrooms are at their peak during fall and winter. In fact, kale gets better as the weather gets colder. For this salad, I roast the mushrooms to concentrate flavor, essentially transforming them into little crunchy umami bombs. I top the salad with deep red, slow-roasted cherry tomatoes for color. (I added them after taking the salad shots this time because they were still hot from the oven and I was too hungry to wait…typical.) The additions of avocado, toasted walnuts and shaved parmesan lend both contrasting texture and enough indulgence to keep me coming back for more. And finally, I finish the dish with lemon zest, thinly sliced scallions and a tiny bit of fresh mint and basil for a touch of freshness to balance the earthy mushrooms.
I’ve made this kale salad about a gazillion times since I first threw it together on a whim and realized I was onto something. While I see the kale, mushrooms and avocado as mandatory, all other ingredients are flex. Don’t have time to slow-roast tomatoes? Leave them out! Prefer shallots to scallions? Swap’em! #Putaneggonit and/or serve it over a cooked grain like farro to make it more of a complete meal. You get the picture.
Lacinato Kale, Roasted Wild Mushroom and Avocado Salad
Ingredients
1.5-2 lbs mixed mushrooms (oyster, king oyster, hen of the woods and maitake are great wild varietals but the more widely available shitake is equally delicious – this will seem like a lot but they shrink up when roasted)
Pinch red pepper flakes
Few shakes of granulated garlic (1/2-1 tsp)
2 bunches lacinato kale, washed, de-stemmed and torn into bite size pieces
½-1 cup toasted and chopped walnuts (hazelnuts are equally delicious)
½-1 cup shaved parmesan (use a vegetable peeler)
4 scallions, thinly sliced
Small handful of fresh torn basil
Small handful of fresh torn mint
Zest and juice of 1 lemon
2 garlic cloves, lightly crushed
Extra virgin olive oil
Kosher salt and freshly cracked pepper
Method
Roast the mushrooms:
Preheat oven to 425.
Prep mushrooms and break them into bite-size pieces. For shitake, this means removing their stems and tearing them into halves or fourths. For king oyster, this means slicing off a tiny bit of the root end and thinly slicing them lengthwise. Prep varies by varietal so purchase shrooms you’re comfortable with or Google proper prep technique.
Place shrooms on a sheet pan (lined with parchment for easy clean-up) and drizzle generously with olive oil, then season to taste with salt and pepper, a few shakes of granulated garlic and a pinch of red pepper flakes.
Roast in the center of the oven for 25-35 minutes, turning the mushrooms halfway through, until they shrink down by nearly half and are very crisp around their edges. Cool on sheet tray.
Make the vinaigrette:
Zest lemon and reserve for salad. Juice zested lemon into small bowl, add in a large pinch of salt, then drizzle in an equal amount of olive oil by volume or a little more. Add in the two crushed garlic cloves and allow to steep while finishing the rest of the salad.
Assemble the salad
Combine the prepped kale (watch Char’s video tutorial!), cooled mushrooms, sliced avo, slow-roasted tomatoes (if using), toasted walnuts, shaved parm, sliced scallions, torn basil and mint and lemon zest in a large salad bowl. Remove garlic cloves from vinaigrette and drizzle over vegetables. Using clean hands or salad tongs, gently toss salad until every nook and cranny of every vegetable is dressed.
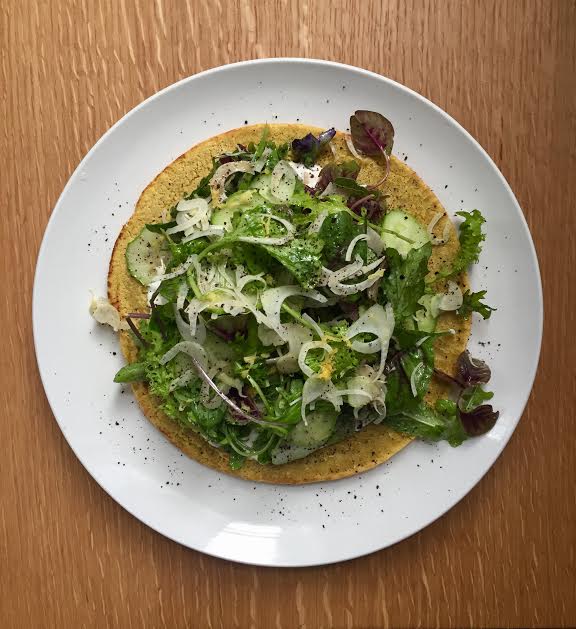
Socca, an unleavened pancake made from chickpea flour and water.
Chickpeas are an ingredient we know and love. They’re satiating and a great source of plant-based protein. And, like most legumes, they provide an excellent canvas for flavor. You can really dress them up in any way you like.
We eat them chilled in our summer bean salads, warm in our winter stews. Pureed in our hummus, fried in our falafel. We love to roast them to crispy, baked perfection. To munch on them as a snack, to include them in our kitchen sink salads. Basically, we love to consume chickpeas pretty much any way, at pretty much any time.
But how often do you find yourself cooking with chickpea flour? If you’re anything like me, the answer is probably not too often.
Chickpea flour—traditionally made by grinding raw chickpeas—is gluten free and nutrient dense. Like whole chickpeas, it’s a fantastic source of protein, and one that doesn’t come with an ominous use-by date. It has a really nice flavor and a rather dense texture, so it holds up well during cooking and tastes delicious once it’s done.
You can use chickpea flour in many ways, most of which are easy, fast, healthy and economical. Read: this is an ingredient worth getting to know.
Not sure where to begin? I can’t think of a better way to break the ice than by making socca.
Socca, native to France, is an unleavened pancake that can be made from equal parts chickpea flour and water. The process will seem friendly to even the most novice cooks. It requires little more than whisking flour and water, heating a lightly oiled pan and cooking a pancake. Isn’t that lovely?
But there’s room for adventure, too.
For instance, you could amp up your socca with egg a la this genius recipe for “cromlet”, a chickpea-omelette hybrid developed at Bon Appetit and beloved by the team here at WWE.
Or perhaps you’d like to use it as a gluten and dairy free roux in your next vegan sauce, as Lindsey Love, a fellow chickpea flour evangelist, suggests.
Love also wrote this recipe for za’tar spiced chickpea crackers, which look to be delicious, healthful and minimalist all at once. They consist of little more than chickpea flour, olive oil and water.
Other intriguing uses: pizza, wraps, baking (it’s a trustworthy binder) and soups, to name a few.
But don’t let me get carried away. If you’re new to chickpea flour, how about a simple, anything-goes, fly-by-the-seat-of-your-pants Salad Socca? The guidelines are straightforward:
Purchase some chickpea flour (also called garbanzo or gram flour), then head to the farmer’s market and fill your tote with spring produce. Make your way home. Make a salad, then make socca, then top the socca with the salad. Easy, right?
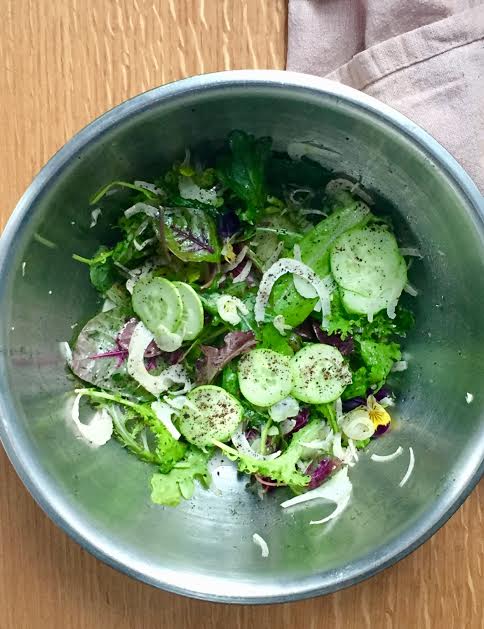
A salad of baby greens, fennel and cucumber.
Below, a bit of inspiration: a recipe for a Salad Socca of my own creation. Let me know what you think of yours. Happy cooking!
Salad Socca
1 cup yogurt
1 tablespoon tahini
1 garlic clove, peeled and pressed
1 lemon, juiced and zested
Salt and pepper to taste
2 cups baby greens
1 fennel bulb, trimmed and thinly sliced
1 small cucumber, thinly sliced
Olive oil to taste
½ teaspoon sumac (optional)
1 cup chickpea flour
1 cup water
In a small bowl, combine yogurt, tahini, garlic, half of the lemon juice and salt and pepper to taste.
Separately, combine greens, fennel and cucumber. Toss well with olive oil, remaining lemon juice, some lemon zest and salt and pepper to taste. Optionally, sprinkle with sumac.
In a medium bowl, combine 1 cup chickpea flour, 1 cup water and a healthy three-finger pinch of salt. Whisk until smooth.
Heat a medium (10-in or so) skillet, then add 1 tablespoon olive oil, or enough to lightly coat surface.
Pour socca batter into skillet and let cook, undisturbed, until golden brown on bottom. It will fill the entire skillet. Flip and repeat on other side.
Once done, top socca with a generous serving of tahini-yogurt. Using the back of a spoon or spatula, spread mixture to evenly coat. Using your hands, top with fennel and cucumber salad. Enjoy.
I put this video together last fall with my new, but already deeply cherished friend Meredith Carlin. Meredith heads up the original programming production team for ulive (it’s a rabbit hole of addictiveness…consider yourself warned), so I was beyond lucky to have her guiding me along the process.
It was my first time on camera and, wow, I did not know just how hard it would be. Respect for anyone who has made a career doing it. There is a steep learning curve but I’m already excited to put together another.
For now, I hope this inspires you to get out to your farmer’s market and then into your kitchens. You’re more likely to find asparagus or mushrooms than cauliflower this time of year, but use this technique as your template and vary your veggies according. Let me know how it goes!
xo L
Crispy-Skinned Sea Bass, Roasted Cauliflower and Parsley Knife Pesto
Serves 2, with BIG servings of cauliflower
Ingredients
For cauliflower
1 medium-large head cauliflower (any variety works but try romanesco, cheddar or another specialty variety if it’s available)
2 tablespoons olive oil
Salt and pepper to taste
For parsley knife pesto
¼ cup toasted almonds
1 garlic clove, minced
1 cup packed parsley
Zest of 1 lemon, divided
Juice of ½ lemon, saved for the end
Salt, pepper and extra virgin olive oil to taste
For sea bass
2 sea bass or trout fillets (If it’s whole, have your fish guy cut it into fillets for you)
1-2 tablespoons Wondra
Salt and pepper to taste
1 tablespoon neutral tasting, high heat oil like grapeseed, vegetable or canola oil
Directions
To make the cauliflower:
Preheat the oven to 425-degrees F.
Meanwhile, break the cauliflower into small florets. The largest should be no bigger than a golf ball. Don’t let any cauliflower crumbs go to waste because these will get extra crispy and delicious.
Divide the florets and crumbs between two sheet pans.
Drizzle each pan with 1 tablespoon olive oil and about ¼ teaspoon each salt and pepper. Use your hands to massage the oil, salt and pepper into the cauliflower. You want every nook and cranny to be well-seasoned.
Roast cauliflower in top and bottom third of preheated oven for 30 minutes until very golden brown, tossing the cauliflower and swapping the placement of the pans halfway through.
Let cool on roasting sheets while making knife pesto and crispy sea bass.
To make the knife pesto:
Pile all pesto ingredients – ¼ cup toasted nuts, 1 minced garlic clove, 1 cup packed parsley, and zest of ½ lemon – onto a cutting board. Using a chef’s knife, chop it down together until it is cohesive pesto, but still chunky enough that you can see it contains almonds and parsley. There really is no right or wrong here though, so make it how you think you might like to eat it.
Reserve while making the crispy sea bass.
To make sea bass (or trout) and assemble dish:
Pat fillets very well with paper towels to get them as dry as possible. Using the back of your cleaned chef knife, scrape the skin side of the fillet to remove any excess moisture, wiping your knife with a paper towel after each swipe. This is almost like squeegeeing your fish.
Now that the fish is extra dry, sprinkle it lightly on both sides with salt and pepper. It isn’t a thick piece of fish, so season lightly!
Dust the skin-side of your fillets heavily with Wondra. Over the sink so you don’t make a mess, blow off any excess Wondra flour.
Place your prepped fish aside while you ready your equipment and finish assembling the roasted cauliflower and parsley knife pesto.
Heat a heavy-bottomed skillet, preferably cast iron over medium-high heat for a few minutes to get it good and hot.
Meanwhile, combine the cauliflower and knife pesto. You can do this on one of the cooled sheet pans to save yourself from needing to clean a separate bowl. Taste and adjust seasoning with salt and pepper if necessary. Feel free to add a drizzle of extra virgin olive oil if it seems dry.
Once fish skillet is hot, add 1 tablespoon of neutral flavored oil and it heat up until it is nearly smoking, about a minute. At this time, add your fillets, skin side down, pushing down on each so that the skin makes full contact with the hot pan. (If you don’t do this, it will buckle and not get as crisp.)
Cook for 3 minutes, all the while pushing down gently with your spatula.
After 3 minutes, flip the fillets and turn off the heat and let the fish finish cooking for 20-30 seconds in the pan’s residual heat.
To plate, place one fillet on each of two serving plates and pile high with the roasted cauliflower and knife pesto. Finish by zesting the second half of the lemon between the two and give them both a good squeeze of fresh lemon juice.
Time to shake things up. Up to now, I haven’t shared a single post about cooking – recipes, tips, how-to’s, etc. – which is pretty crazy. My love of being in the kitchen is what got me into the nutrition field in the first place. And it is a lot easier to make eating well a priority if the healthy food you are cooking and eating actually tastes good. I should be showing you how to do that! So from here on out, I’m going to be sharing a lot more of this type of stuff. It’s fun for me, and hopefully useful for you. Let me know if you’re into it.
First up, how to breakdown a squash. It struck me the other day that if people are limiting themselves to the pre-cut butternut squash at their local Whole Foods, they are missing out on lots of the delicious varietals that don’t come conveniently pre-disassembled. Kabocha, delicata, spaghetti…so many options, each of which have a slightly unique taste and texture. My favorite happen to be the types with edible skin (delicata, kabocha, acorn), because they are quicker to prepare (less peeling) but also because I love the contrast of the soft dense flesh and crisp, almost crunchy skin.
There is no right or wrong way to cut up a squash (or maybe there is according to Thomas Keller, but not for us mere mortals). Just keep in mind that if you want to keep all of your fingers intact, a sharp knife is a total necessity and creating a flat surface to stabilize the squash is always better than trying to cut through it while balancing the round surface on your cutting board.
How do you cut your squash? Whats your favorite variety and how do you prepare it?

 2. With wet hands, place a decent size scoop of the rice onto the nori and press down until even thickness throughout. The water will help the sushi rice to not stick to your hands. Life hack!
 4. Now the fun part! Using the sushi mat and plastic as a guide, tightly roll the sushi. Make sure the pressure is even when you roll to help prevent lumps. (Note: Chef hands in dire need of a paraffin treatment!!)