Eggplant Braised with Cherry Tomatoes and Garlic

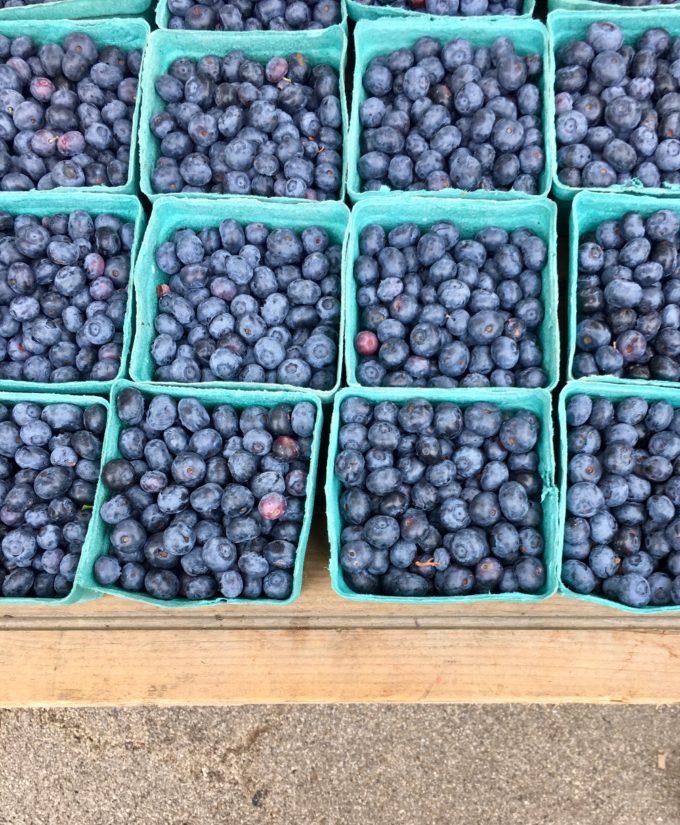
For those who love to cook, there is possibly no outing quite as enjoyable as a trip to the farmers’ market. Getting to see what’s at its peak and speak with the people who grew it feels like a privilege in comparison to shopping at the grocery store.

I like to go without a plan, grab whatever looks best and then spend my walk home daydreaming about what I can make. While I have a terrible memory when it comes to things like names, my brain has a crystal clear index of every recipe I’ve ever read, most of the ingredients within it and where I can find it. It also catalogs all food images from places like Instagram and food magazines.

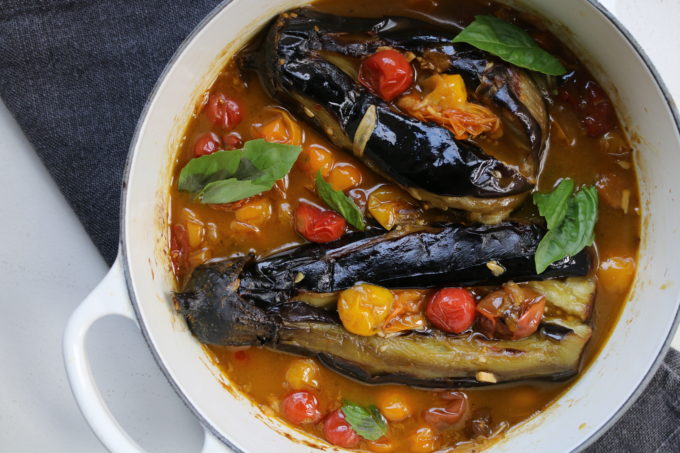
This week, when I scored the most beautiful, deeply purple eggplants with taut, shiny skin and cherry tomatoes so sweet I could have popped an entire pint as if they were berries, I was reminded of a picture I’d seen on Canal House’s Instagram feed.

These days, I prefer to cook from pictures rather than recipes. The former allows for creativity and spontaneity, while the latter is time consuming (re-referring to the written word) and/or disappointing (I usually know how to produce the flavors I prefer). As the famous Italian chef Lidia Bastianich said in a recent interview, “Release yourself from the recipe!”

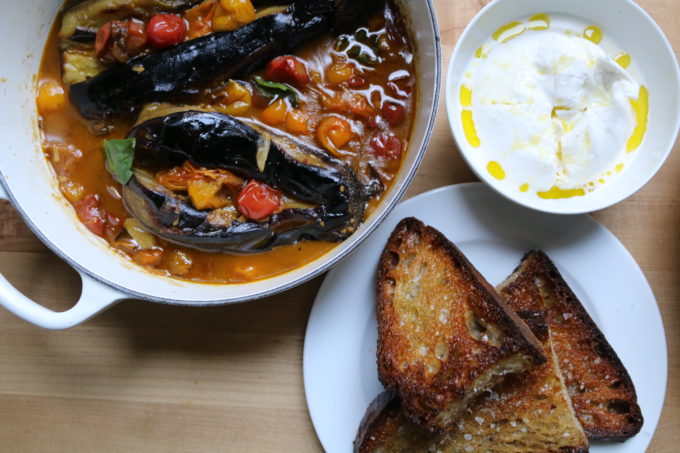
So, with that in mind, I hit my kitchen to make a braised eggplant dish sweet with cherry tomatoes, rich with olive oil, and spicy with garlic and red pepper flakes. Chris and I sat down to dinner with the dutch oven between us, a fresh ball of burrata cheese, sliced crosswise and drizzled with our best Italian extra virgin olive oil, and pan-fried and garlic-rubbed peasant bread to serve as a bed for it all. I also made a shaved fennel and arugula salad showered with plenty of lemon juice and more olive oil because I always like to have something bright to cut through something so rich.

This is the rustic fair that dreams are made of.

EGGPLANT BRAISED WITH CHERRY TOMATOES AND GARLIC

Ingredients
2 small to medium eggplant
4 cloved garlic, thinly sliced
¼ tsp red chile flakes
4 tablespoons olive oil
2 pints cherry tomatoes, left whole
Several handfuls of basil, torn
1 ball burrata or a couple of balls of fresh mozzarella (optional)
Grilled or pan-fried and bread rubbed with garlic (peasant loaf, ciabatta, or any other bread you like)
Salt and pepper

Directions
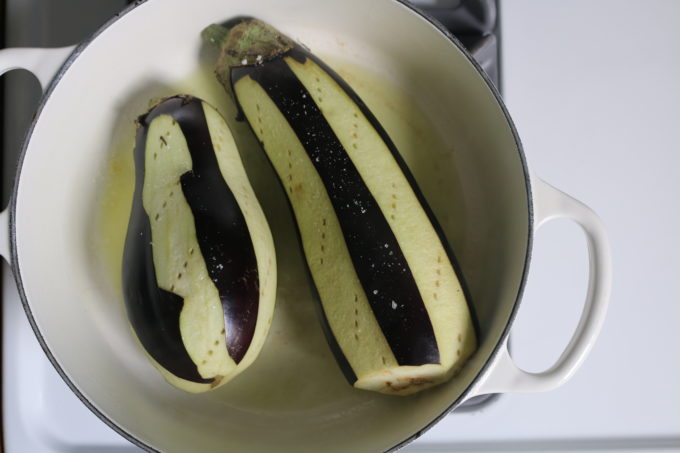
Prep the eggplant: Peel long strips down the eggplant from stem to end, leaving them with a zebra print. Next, make a partial slit lengthwise down the center of the eggplant but try not to cut all the way through. This is just so the flavorful broth has an easier time penetrating the eggplant. Season them lightly with salt and freshly ground pepper, massaging them into the eggplant a bit.

Preheat a braising pot over medium heat. Add 2 tablespoons of olive oil. Once hot, pan fry the eggplants, turning them every two minutes until they are well-browned on all sides. Remove them to a plate.

Add remaining two tablespoons olive oil and add 4 thinly sliced garlic cloves and a generous pinch of red pepper flakes. Once garlic is very lightly golden, add in the 2 pint whole cherry tomatoes, a generous pinch of salt and a few grinds of black pepper, and stir to combine. Place top on braising pot and let it do its thing over medium-low heat.

After about 20 minutes, most of the cherry tomatoes will have popped open, producing a juicy liquid. Taste it and correct seasoning with more salt if necessary. Carefully add the eggplant into the juicy tomatoes, slit side up and ladle a little of the braising liquid inside the eggplant. Add a sprig of basil, pushing it into the liquid, cover and continue to braise for 20 minutes. At this point, the eggplant will be meltingly tender and flavorful.

To serve, remove the sprig of basil and add a fresh shower of leaves over the braise. Present the whole pot on the table with several spoons to dig in, grilled garlic-rubbed bread and burrata or sliced fresh mozzarella. Enjoy!

Serves 4 (Any leftovers can be smashed into a delicious pasta sauce for later in the week!)

Slab Pie for Every Season

Although it may not technically be summer anymore, we’re using up all the leftover summer fruits and veggies that need their last hurrah!

August meant a sweaty AC at full blast and an excuse to eat endless amounts of ice cream. Oh, but my sweet tooth didn’t stop there. I had my eye on all the peaches, nectarines, plums and berries  strewn about the market. Where did my mind automatically go? Pie!

I thought it was about time WWE did some baking. Plus, what better way to turn our attention away from the beating hot sun and toward one of the season’s best assets, fruit! An excuse to spend the morning at a farmer’s market with Rian wasn’t bad either.

We indulged in the juiciest peaches and two full pints of plump blueberries to fill up our first pie. And there was no way we were going to stop there. The table of 10 different kinds of tomatoes beckoned us and we couldn’t resist. Mesmerized by the abundance of veggies, we couldn’t bare pass them up! Suddenly, we knew what we had to do; we had to make a second pie! The wheels in Rian and my head started turning and we jutted around from farmstand to farmstand raiding tasting tables with toothpicks and sniffing bundles of herbs. Savory was, undoubtedly, our forte and the possibilities were endless! We landed on a tomato pie with fresh ricotta we would mix with a narrowed down collection of herbs (thyme and basil) and garlic.

The average piecrust is made up of butter, flour, salt, sugar and water. There are always those folks who think lard is the rule of thumb, but at the end of the day, it’s whatever you’re used to. There are others that get nervous around pie dough. Is the butter too soft, is the water cold enough, did I work it too much? Trust me when I say, there’s a reason people say, ‘easy as pie’. Indeed the crust part of the whole thing was pretty simple; only problem was that I didn’t have a food processor. In all my years, I’d never actually used one to make piecrust. I’d only ever seen my mom do it by hand and I actually enjoy it that way. So, when I set out to make slab pies, I wasn’t sure I would find this method as charming. My boyfriend spent the evening watching me make three (just incase) piecrusts from scratch with my hands. He thought I was crazy, pounding cubes of frozen butter with a whisk looking thing (pastry cutter). Then I showed him a YouTube of the “knife-method”. Now that’s crazy!

For these slab pies, I used Martha Stewart’s pie dough recipe x2 (cause that’s what Laura uses). It’s all butter, a little gooey and flakey in all the right places. The key is adding just enough water. Once the butter and flour mixture mimics a damp sandy texture, add in just enough water so that when you pinch the dough it sticks together just enough. You know you’ve added too much water when the dough starts to feel or look like cookie dough. In a food processor this happens really fast so stick to quick pulses.

For the fillings we went with a universal sugar mixture that can be mixed in with just about any fruit your heart desires. The same one we use at Copper Beech (one of our best sellers). As for our savory experiment we picked an assortment of heirloom tomatoes, scallions the size of Rian’s head and sweet ricotta with herbs and garlic of course.

The slab-pie, the American cousin to the Galette and forefather to the pop-tart is made with two regular 9×12 sheet trays, a rolling pin, a sheet of parchment and a fork. Roll the dough out until it’s a little larger than the sheet tray. We like to fill two sheet trays, top and bottom to make it easier to assemble later. If there are some missing spots or tears, don’t worry; you can patch them up with the excess overhang. Once they’re rolled out add your filling and flip the top crust over top. Crimp the edges and use a fork to imprint along the edges. It’s important to remember to poke holes in the top layer for ventilation. We also like to sprinkle it with cream to ensure a beautiful golden crust but you can finish with any sort of glaze you like. For a sweet pie we recommend a sprinkle of turbinado (sugar in the raw) and flakey maldon salt and pepper for a savory.

Bake until the crust is golden. There might be some over-flow. This is totally normal and adds a little homemade personality. We recommend keeping a clean sheet tray on a lower rack to catch spills. For a sweet pie, allow it to cool for at least 15 minutes before serving (with a heaping scoop of ice cream, of course). For savory, it’s safe to serve straight away! Yummmm! Pie for dinner and dessert perhaps? Too much? Nah! I’ll be concocting winter squash pies in no time!

Dough (Martha Stewart’s recipe)
5 cups AP flour
2 tsp sugar
1 tbsp kosher salt
2 cups (4 sticks) butter, cut into cubes
1 cup ice water

Sweet Filling
6-7 cups fruit of choice sliced into bite-size pieces
1/2 cup white sugar
1/4 cup brown sugar
1/4 cup cornstarch
zest of 1 lemon
juice of 1/2 lemon
pinch of salt
a dash of cinnamon (optional)

Savory Filling
6-7 cups sliced heirloom tomatoes, sliced
1 1/2 cups ricotta
1/4 cup sliced scallions
1/4 cup chopped fresh basil

2 tbs. fresh thyme, minced
zest of 1 lemon
2-3 cloves garlic, minced
1 tsp. salt

1/2 tsp. fresh ground pepper

Olive oil

To Finish
2 tbsp heavy cream
2-3 tablespoons Sugar in the Raw or (for savory) Maldon salt and fresh ground pepper

Method

To make dough: In Cuisinart, process dough’s dry ingredients. Once incorporated, add in butter cubes and pulse until broken up and flour looks sandy. Now, with the motor on, slowly drizzle in ice water. Stop the second the dough begins to come together. Dump onto clean work surface and knead 3 times until flour is just incorporated. Wrap tightly in plastic wrap, gently smoosh into the rough shape of a rectangle (this will make your life easier later on) and refrigerate for at least an hour and up to 3 days.

For the sweet filling: Mix all ingredients together. Voila. Do this right before you’re going to bake your pie so it doesn’t get too runny.

For the savory filling: Lay heirloom tomatoes evenly in one layer on the surface of the dough. Then mix the following ingredients until well combined and sprinkle on top of the tomatoes. Finish with a glug of olive oil and salt and pepper to taste.

To form and bake slab pie: Preheat oven to 375 degrees. Remove dough from fridge about 30 minutes before you’re ready to work with it. Slice dough into two pieces, one about two-thirds of the dough, the other about one-third of the dough. The fact that you wrapped this in the shape of a rectangle should help make this and rolling it out as a rectangle a little easier.
On a floured work surface and with a rolling pin, roll the bigger slab of dough out into a rectangle a little bigger than a 15×10″ sheet pan. You want to be able to fold excess dough over to create the outside crust. Don’t be scared, it doesn’t have to be perfect. Move the dough and add more flour to your work surface as necessary to prevent sticking. Once you’re there (or as close to it as you’re going to get), transfer the dough to the sheet pan. Roll out the second slab of dough to approximately fit the top of the pie in a similar fashion.
Add filling to the slab pie, then lay the second sheet of dough over the top. Fold the bottom layer’s excess dough over the top and either pinch or crimp the two dough slabs together. Next, brush the top lightly with heavy cream, poke it all over with a fork and generously shower over the raw sugar and malden salt.
Into the oven is goes for about an hour. Check it after about 50 minutes. If the top is nicely golden, you’re good. I like to err on the side of well-browned versus just-bronzed, but that’s up to you.

Enjoy with vanilla cream!

Sweet pie dreams!

Charlotte


Kristina’s Salsa Verde

Chickpea and farro salad with fennel radish and salsa verde

The more you cook, the more you develop your signature style. Anyone who eats our food knows that well toasted nuts, strategically placed cheese and tons of citrus are a few of the What We Eat team’s hallmarks. But if there is one thing that defines our cooking, it’s our ridiculously abundant use of fresh herbs.

There is no better way to impart explosive flavor than with fresh herbs. Mint, cilantro, parsley and scallions are constants on our grocery lists, but we also reserve a place in our hearts for tarragon, basil, sage and dill. Of course, there are many others, but having the above on hand at any given time is crucial to the success of any meal.

Smorgasbord with Salsa Verde

An added perk to our herb obsession is that we find ourselves with an surplus of odds and ends at the end of the week…a few stems sprouting sad broken parsley leaves, a handful of bruised cilantro or one lone sprig of rosemary. What to do with these little bits that are too often thrown away as casualty or waste? There is a simple answer, a lesson I learned years ago that has since been held close and always remembered. Let me paint a picture for you…

It was 2010. I was sitting outside at an Italian bistro, sipping chilled white wine, awaiting my meal, a perfect day. Then the roast chicken was placed in front of me. After savoring my first bite of the tender meat, I questioned aloud, “What is it that makes this simple meal so unbelievably amazing?” As they say, the secret is in the sauce.

Roast chicken with lemon zest and salsa verde green sauce

Drizzled across the crisp and charred chicken skin was a thin but vibrantly green dressing, the ingredients of which were so frustratingly mysterious and difficult to pinpoint that it warranted further investigation. My helpful waiter informed me it was salsa verde (aka green sauce), a mix of whatever herbs they had on hand. Herbs + olive oil + blender = magical sauce served as an accoutrement to any dish from red meats to poultry, fish or vegetables. This aha moment will forever stick with me. Salsa verde, the endlessly versatile little black dress of sauces, appears as a star in many of my meals. It’s my signature.

Therefore, it is finally time to share the recipe for my secret sauce. Keep in mind that certain ingredients may be omitted or altered, but that the recipe below is what I have found to be the tastiest. I’ve gotten Laura and Rian hooked on it as well, so next time one of them makes you something with an impossibly delicious green sauce, you’ll know who deserves credit.

With love, Kristina:)

Salsa Verde

  • 1/3 cup basil
  • 1/3 cup cilantro
  • 1/3 cup parsley
  • 2 tablespoons tarragon
  • 2 tablespoons chives
  • 1 tablespoon sage
  • 1 tablespoon dill
  • 1 tablespoon rosemary
  • 1 tablespoon capers
  • 1-3 anchovy fillets
  • 2 garlic cloves
  • 1/4th teaspoon salt
  • 1 cup olive oil

Roughly chop all herbs, garlic and anchovies and then place all ingredients other than the olive oil in a food processor. Pulse the contents of the food processor and then gradually stream in the olive oil. Taste and adjust seasoning as desired.

The end result should be a vibrantly green sauce in which the original integrity of some of the herbs is still apparent. This means that it should look like more of a rough chop rather than a paste or puree. We like to keep it rustic. Drizzle over any meal of choice and serve. Enjoy!

Roast carrot and egg salad with salsa verde